# Directory Structure
```
├── .gitignore
├── Dockerfile
├── docs
│ └── apps-sdk
│ ├── _blog_realtime-api_.txt
│ ├── _codex_cloud_code-review_.txt
│ ├── _codex_pricing_.txt
│ ├── _tracks_ai-application-development_.txt
│ ├── _tracks_building-agents.txt
│ ├── apps-sdk_app-developer-guidelines.txt
│ ├── apps-sdk_build_custom-ux_.txt
│ ├── apps-sdk_build_examples.txt
│ ├── apps-sdk_plan_components.txt
│ └── apps-sdk_plan_use-case.txt
├── LICENSE
├── package.json
├── pnpm-lock.yaml
├── README.md
├── smithery.yaml
├── src
│ ├── index.ts
│ └── proxy-server.ts
└── tsconfig.json
```
# Files
--------------------------------------------------------------------------------
/.gitignore:
--------------------------------------------------------------------------------
```
dist
node_modules
.env
```
--------------------------------------------------------------------------------
/README.md:
--------------------------------------------------------------------------------
```markdown
# OP.GG MCP Server
[](https://smithery.ai/server/@opgginc/opgg-mcp)
The OP.GG MCP Server is a Model Context Protocol implementation that seamlessly connects OP.GG data with AI agents and platforms. This server enables AI agents to retrieve various OP.GG data via function calling.


## Overview
This MCP server provides AI agents with access to OP.GG data through a standardized interface. It offers a simple way to connect to our remote server (https://mcp-api.op.gg/mcp), allowing for easy installation and immediate access to OP.GG data in a format that's easily consumable by AI models and agent frameworks.
## Features
The OP.GG MCP Server currently supports the following tools:
### League of Legends
- **lol-champion-leader-board**: Get ranking board data for League of Legends champions.
- **lol-champion-analysis**: Provides analysis data for League of Legends champions (counter and ban/pick data available in the "weakCounters" field).
- **lol-champion-meta-data**: Retrieves meta data for a specific champion, including statistics and performance metrics.
- **lol-champion-skin-sale**: Retrieves information about champion skins that are currently on sale.
- **lol-summoner-search**: Search for League of Legends summoner information and stats.
- **lol-champion-positions-data**: Retrieves position statistics data for League of Legends champions, including win rates and pick rates by position.
- **lol-summoner-game-history**: Retrieve recent game history for a League of Legends summoner.
- **lol-summoner-renewal**: Refresh and update League of Legends summoner match history and stats.
### Esports (League of Legends)
- **esports-lol-schedules**: Get upcoming LoL match schedules.
- **esports-lol-team-standings**: Get team standings for a LoL league.
### Teamfight Tactics (TFT)
- **tft-meta-trend-deck-list**: TFT deck list tool for retrieving current meta decks.
- **tft-meta-item-combinations**: TFT tool for retrieving information about item combinations and recipes.
- **tft-champion-item-build**: TFT tool for retrieving champion item build information.
- **tft-recommend-champion-for-item**: TFT tool for retrieving champion recommendations for a specific item.
- **tft-play-style-comment**: This tool provides comments on the playstyle of TFT champions.
### Valorant
- **valorant-meta-maps**: Valorant map meta data.
- **valorant-meta-characters**: Valorant character meta data.
- **valorant-leaderboard**: Fetch Valorant leaderboard by region.
- **valorant-agents-composition-with-map**: Retrieve agent composition data for a Valorant map.
- **valorant-characters-statistics**: Retrieve character statistics data for Valorant, optionally filtered by map.
- **valorant-player-match-history**: Retrieve match history for a Valorant player using their game name and tag line.
## Usage
The OP.GG MCP Server can be used with any MCP-compatible client. The following content explains installation methods using Claude Desktop as an example.
### Direct Connection via StreamableHttp
If you want to connect directly to our StreamableHttp endpoint, you can use the `supergateway` package. This provides a simple way to connect to our remote server without having to install the full OP.GG MCP Server.
Add the following to your `claude_desktop_config.json` file:
#### Mac/Linux
```json
{
"mcpServers": {
"opgg-mcp": {
"command": "npx",
"args": [
"-y",
"supergateway",
"--streamableHttp",
"https://mcp-api.op.gg/mcp"
]
}
}
}
```
#### Windows
```json
{
"mcpServers": {
"opgg-mcp": {
"command": "cmd",
"args": [
"/c",
"npx",
"-y",
"supergateway",
"--streamableHttp",
"https://mcp-api.op.gg/mcp"
]
}
}
}
```
This configuration will use the `supergateway` package to establish a direct connection to our StreamableHttp endpoint, providing you with immediate access to all OP.GG data tools.
### Installing via Smithery
To install OP.GG MCP for Claude Desktop automatically via [Smithery](https://smithery.ai/server/@opgginc/opgg-mcp):
```bash
$ npx -y @smithery/cli@latest install @opgginc/opgg-mcp --client claude --key {SMITHERY_API_KEY}
```
### Adding to MCP Configuration
To add this server to your Claude Desktop MCP configuration, add the following entry to your `claude_desktop_config.json` file:
#### Mac/Linux
```json
{
"mcpServers": {
"opgg-mcp": {
"command": "npx",
"args": [
"-y",
"@smithery/cli@latest",
"run",
"@opgginc/opgg-mcp",
"--key",
"{SMITHERY_API_KEY}"
]
}
}
}
```
#### Windows
```json
{
"mcpServers": {
"opgg-mcp": {
"command": "cmd",
"args": [
"/c",
"npx",
"-y",
"@smithery/cli@latest",
"run",
"@opgginc/opgg-mcp",
"--key",
"{SMITHERY_API_KEY}"
]
}
}
}
```
After adding the configuration, restart Claude Desktop for the changes to take effect.
## License
This project is licensed under the MIT License - see the LICENSE file for details.
## Related Links
- [Model Context Protocol](https://modelcontextprotocol.io)
- [OP.GG](https://op.gg)
```
--------------------------------------------------------------------------------
/tsconfig.json:
--------------------------------------------------------------------------------
```json
{
"extends": "@tsconfig/node22/tsconfig.json",
"compilerOptions": {
"noEmit": true,
"noUnusedLocals": true,
"noUnusedParameters": true
}
}
```
--------------------------------------------------------------------------------
/smithery.yaml:
--------------------------------------------------------------------------------
```yaml
# Smithery configuration file: https://smithery.ai/docs/config#smitheryyaml
startCommand:
type: stdio
configSchema:
# JSON Schema defining the configuration options for the MCP.
type: object
properties: {}
default: {}
description: No configuration required
commandFunction:
# A JS function that produces the CLI command based on the given config to start the MCP on stdio.
|-
(config) => ({command: 'node', args: ['dist/index.js']})
exampleConfig: {}
```
--------------------------------------------------------------------------------
/Dockerfile:
--------------------------------------------------------------------------------
```dockerfile
# Generated by https://smithery.ai. See: https://smithery.ai/docs/config#dockerfile
FROM node:lts-alpine AS build
WORKDIR /app
# Install dependencies including dev for build
COPY package.json package-lock.json* pnpm-lock.yaml* ./
RUN npm install
# Copy source
COPY . .
# Build the project
RUN npm run build
# Production image
FROM node:lts-alpine AS runtime
WORKDIR /app
# Copy only production dependencies
COPY package.json package-lock.json* pnpm-lock.yaml* ./
RUN npm install --production
# Copy built files
COPY --from=build /app/dist ./dist
# Default command
CMD ["node", "dist/index.js"]
```
--------------------------------------------------------------------------------
/package.json:
--------------------------------------------------------------------------------
```json
{
"name": "opgg-mcp",
"version": "1.0.1",
"main": "dist/index.js",
"scripts": {
"build": "tsup",
"test": "npx @modelcontextprotocol/inspector@latest node dist/index.js"
},
"bin": {
"opgg-mcp": "dist/index.js"
},
"keywords": [
"MCP",
"SSE",
"proxy"
],
"type": "module",
"license": "MIT",
"module": "dist/index.js",
"types": "dist/index.d.ts",
"dependencies": {
"@modelcontextprotocol/sdk": "^1.10.0",
"eventsource": "^3.0.6"
},
"repository": {
"url": "https://github.com/opgginc/opgg-mcp"
},
"devDependencies": {
"@tsconfig/node22": "^22.0.1",
"@types/node": "^22.14.1",
"tsup": "^8.4.0",
"typescript": "^5.8.3"
},
"tsup": {
"entry": [
"src/index.ts"
],
"format": [
"esm"
],
"dts": true,
"splitting": true,
"sourcemap": true,
"clean": true
}
}
```
--------------------------------------------------------------------------------
/src/index.ts:
--------------------------------------------------------------------------------
```typescript
#!/usr/bin/env node
import { Client } from "@modelcontextprotocol/sdk/client/index.js";
import { Server } from "@modelcontextprotocol/sdk/server/index.js";
import { EventSource } from "eventsource";
import { setTimeout } from "node:timers";
import util from "node:util";
import { proxyServer } from "./proxy-server.js";
import { StreamableHTTPClientTransport } from '@modelcontextprotocol/sdk/client/streamableHttp.js';
import { StdioServerTransport } from "@modelcontextprotocol/sdk/server/stdio.js";
util.inspect.defaultOptions.depth = 8;
if (!("EventSource" in global)) {
// @ts-expect-error - figure out how to use --experimental-eventsource with vitest
global.EventSource = EventSource;
}
const proxy = async (url: string): Promise<void> => {
const client = new Client(
{
name: "ssl-client",
version: "1.0.0",
},
{
capabilities: {},
},
);
const transport = new StreamableHTTPClientTransport(new URL(url));
await client.connect(transport);
const serverVersion = client.getServerVersion() as {
name: string;
version: string;
};
const serverCapabilities = client.getServerCapabilities() as {};
const server = new Server(serverVersion, {
capabilities: serverCapabilities,
});
const stdioTransport = new StdioServerTransport();
await server.connect(stdioTransport);
await proxyServer({
server,
client,
serverCapabilities,
});
};
const main = async () => {
process.on("SIGINT", () => {
console.info("SIGINT received, shutting down");
setTimeout(() => {
process.exit(0);
}, 1000);
});
try {
await proxy("https://mcp-api.op.gg/mcp");
} catch (error) {
console.error("could not start the proxy", error);
setTimeout(() => {
process.exit(1);
}, 1000);
}
};
await main();
```
--------------------------------------------------------------------------------
/src/proxy-server.ts:
--------------------------------------------------------------------------------
```typescript
import { Server } from "@modelcontextprotocol/sdk/server/index.js";
import {
CallToolRequestSchema,
CompleteRequestSchema,
GetPromptRequestSchema,
ListPromptsRequestSchema,
ListResourcesRequestSchema,
ListResourceTemplatesRequestSchema,
ListToolsRequestSchema,
LoggingMessageNotificationSchema,
ReadResourceRequestSchema,
SubscribeRequestSchema,
UnsubscribeRequestSchema,
ResourceUpdatedNotificationSchema,
ServerCapabilities,
} from "@modelcontextprotocol/sdk/types.js";
import { Client } from "@modelcontextprotocol/sdk/client/index.js";
export const proxyServer = async ({
server,
client,
serverCapabilities,
}: {
server: Server;
client: Client;
serverCapabilities: ServerCapabilities;
}) => {
if (serverCapabilities?.logging) {
server.setNotificationHandler(
LoggingMessageNotificationSchema,
async (args) => {
return client.notification(args);
},
);
}
if (serverCapabilities?.prompts) {
server.setRequestHandler(GetPromptRequestSchema, async (args) => {
return client.getPrompt(args.params);
});
server.setRequestHandler(ListPromptsRequestSchema, async (args) => {
return client.listPrompts(args.params);
});
}
if (serverCapabilities?.resources) {
server.setRequestHandler(ListResourcesRequestSchema, async (args) => {
return client.listResources(args.params);
});
server.setRequestHandler(
ListResourceTemplatesRequestSchema,
async (args) => {
return client.listResourceTemplates(args.params);
},
);
server.setRequestHandler(ReadResourceRequestSchema, async (args) => {
return client.readResource(args.params);
});
if (serverCapabilities?.resources.subscribe) {
server.setNotificationHandler(
ResourceUpdatedNotificationSchema,
async (args) => {
return client.notification(args);
},
);
server.setRequestHandler(SubscribeRequestSchema, async (args) => {
return client.subscribeResource(args.params);
});
server.setRequestHandler(UnsubscribeRequestSchema, async (args) => {
return client.unsubscribeResource(args.params);
});
}
}
if (serverCapabilities?.tools) {
server.setRequestHandler(CallToolRequestSchema, async (args) => {
return client.callTool(args.params);
});
server.setRequestHandler(ListToolsRequestSchema, async (args) => {
return client.listTools(args.params);
});
}
server.setRequestHandler(CompleteRequestSchema, async (args) => {
return client.complete(args.params);
});
};
```
--------------------------------------------------------------------------------
/docs/apps-sdk/_codex_cloud_code-review_.txt:
--------------------------------------------------------------------------------
```
---
url: "https://developers.openai.com/codex/cloud/code-review/"
title: "Code Review"
---
## Search the docs
⌘K/CtrlK
Close
Clear
Primary navigation
Codex
ResourcesCodexChatGPTBlog
Clear
- [Home](https://developers.openai.com/codex)
- [Quickstart](https://developers.openai.com/codex/quickstart)
- [Concepts](https://developers.openai.com/codex/concepts)
- [Pricing](https://developers.openai.com/codex/pricing)
- [Changelog](https://developers.openai.com/codex/changelog)
### Codex CLI
- [Overview](https://developers.openai.com/codex/cli)
- [Configuration](https://developers.openai.com/codex/local-config#cli)
### Codex IDE Extension
- [Set up your IDE](https://developers.openai.com/codex/ide)
- [Configuration](https://developers.openai.com/codex/local-config#ide)
- [IDE → Cloud tasks](https://developers.openai.com/codex/ide/cloud-tasks)
### Codex Cloud
- [Delegate to Codex](https://developers.openai.com/codex/cloud)
- [Environments](https://developers.openai.com/codex/cloud/environments)
- [Code Review](https://developers.openai.com/codex/cloud/code-review)
- [Internet Access](https://developers.openai.com/codex/cloud/internet-access)
### Codex SDK
- [Overview](https://developers.openai.com/codex/sdk)
- [TypeScript](https://developers.openai.com/codex/sdk#typescript-library)
- [GitHub Action](https://developers.openai.com/codex/sdk#github-action)
### Guides
- [Agents SDK](https://developers.openai.com/codex/guides/agents-sdk)
- [Prompting Codex](https://developers.openai.com/codex/prompting)
- [Model Context Protocol (MCP)](https://developers.openai.com/codex/mcp)
- [Autofix CI](https://developers.openai.com/codex/autofix-ci)
- [Enterprise Admin](https://developers.openai.com/codex/enterprise)
- [Security Admin](https://developers.openai.com/codex/security)
- [Codex on Windows](https://developers.openai.com/codex/windows)
### Integrations
- [Slack](https://developers.openai.com/codex/integrations/slack)
### Resources
- [AGENTS.md](https://agents.md/)
- [Codex on GitHub](https://github.com/openai/codex)
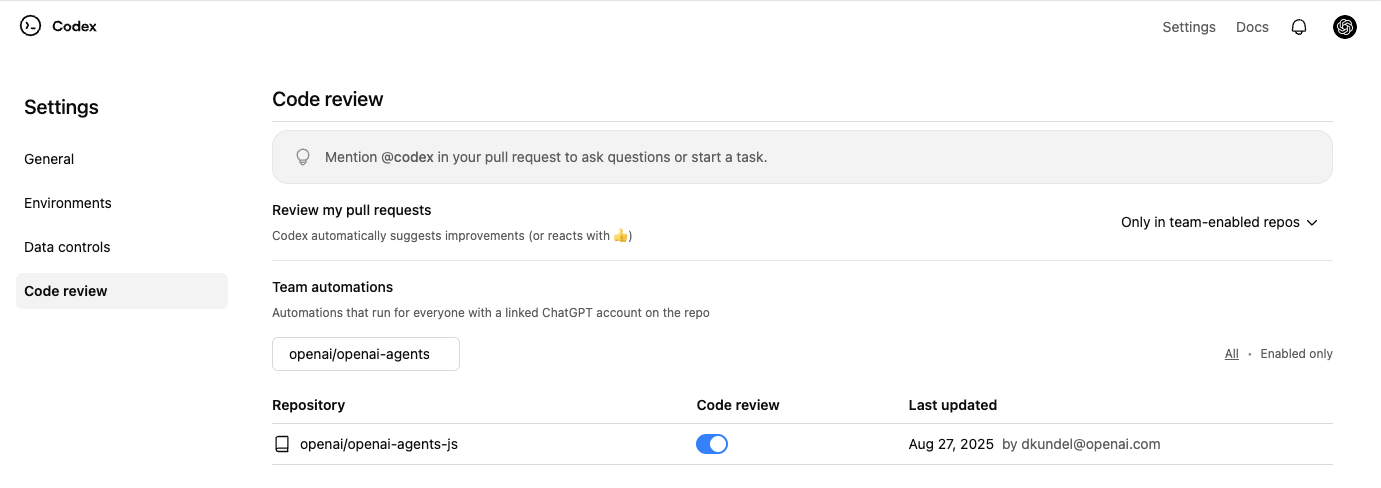
Codex can review code directly in GitHub. This is great for finding bugs and improving code quality.
## Setup
Before you can use Codex directly inside GitHub, you will need to make sure [Codex cloud](https://developers.openai.com/codex/cloud) is set up.
Afterwards, you can go into the [Codex settings](https://chatgpt.com/codex/settings/code-review) and enable “Code review” on your repository.
## Usage
After you have enabled Code review on your repository, you can start using it by tagging `@codex` in a comment on a pull request.
To trigger a review by codex you’ll have to specifically write `@codex review`.
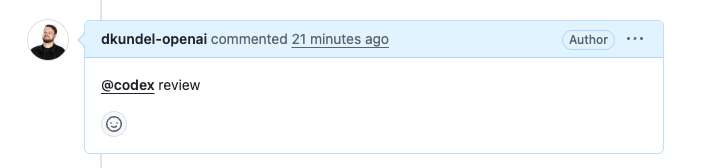
Afterwards you’ll see Codex react to your comment with 👀 acknowledging that it started your task.
Once completed Codex will leave a regular code review in the PR the same way your team would do.
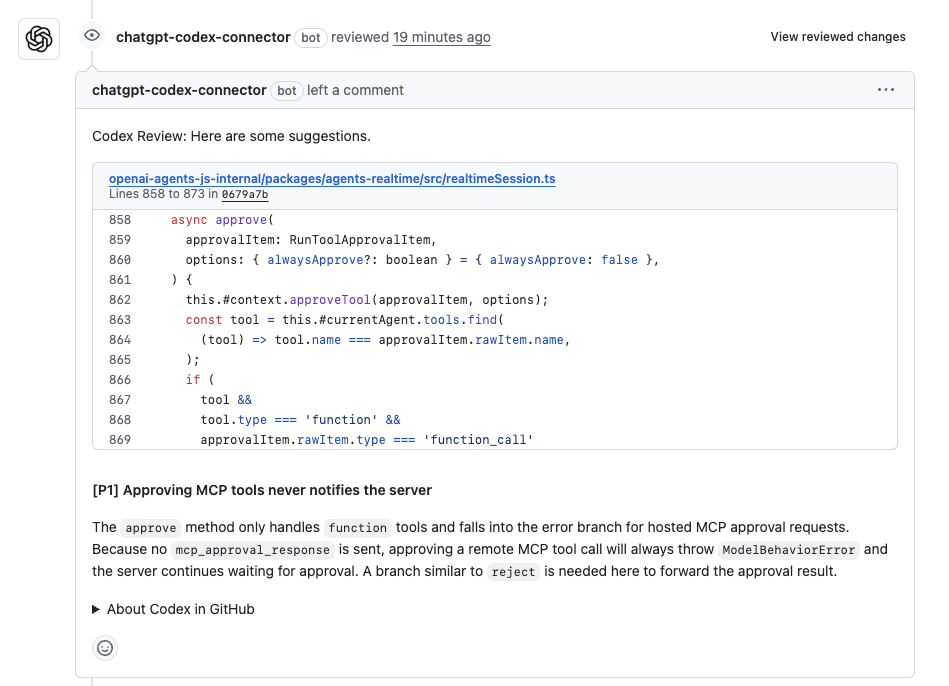
## Giving Codex other tasks
If you mention `@codex` in a comment with anything other than `review` Codex will kick off a [cloud task](https://developers.openai.com/codex/cloud) instead with the context of your pull request.
```
--------------------------------------------------------------------------------
/docs/apps-sdk/apps-sdk_plan_components.txt:
--------------------------------------------------------------------------------
```
---
url: "https://developers.openai.com/apps-sdk/plan/components"
title: "Design components"
---
## Search the docs
⌘K/CtrlK
Close
Clear
Primary navigation
ChatGPT
ResourcesCodexChatGPTBlog
Clear
- [Home](https://developers.openai.com/apps-sdk)
### Core Concepts
- [MCP Server](https://developers.openai.com/apps-sdk/concepts/mcp-server)
- [User interaction](https://developers.openai.com/apps-sdk/concepts/user-interaction)
- [Design guidelines](https://developers.openai.com/apps-sdk/concepts/design-guidelines)
### Plan
- [Research use cases](https://developers.openai.com/apps-sdk/plan/use-case)
- [Define tools](https://developers.openai.com/apps-sdk/plan/tools)
- [Design components](https://developers.openai.com/apps-sdk/plan/components)
### Build
- [Set up your server](https://developers.openai.com/apps-sdk/build/mcp-server)
- [Build a custom UX](https://developers.openai.com/apps-sdk/build/custom-ux)
- [Authenticate users](https://developers.openai.com/apps-sdk/build/auth)
- [Persist state](https://developers.openai.com/apps-sdk/build/storage)
- [Examples](https://developers.openai.com/apps-sdk/build/examples)
### Deploy
- [Deploy your app](https://developers.openai.com/apps-sdk/deploy)
- [Connect from ChatGPT](https://developers.openai.com/apps-sdk/deploy/connect-chatgpt)
- [Test your integration](https://developers.openai.com/apps-sdk/deploy/testing)
### Guides
- [Optimize Metadata](https://developers.openai.com/apps-sdk/guides/optimize-metadata)
- [Security & Privacy](https://developers.openai.com/apps-sdk/guides/security-privacy)
- [Troubleshooting](https://developers.openai.com/apps-sdk/deploy/troubleshooting)
### Resources
- [Reference](https://developers.openai.com/apps-sdk/reference)
- [App developer guidelines](https://developers.openai.com/apps-sdk/app-developer-guidelines)
## Why components matter
UI components are the human-visible half of your connector. They let users view or edit data inline, switch to fullscreen when needed, and keep context synchronized between typed prompts and UI actions. Planning them early ensures your MCP server returns the right structured data and component metadata from day one.
## Clarify the user interaction
For each use case, decide what the user needs to see and manipulate:
- **Viewer vs. editor** – is the component read-only (a chart, a dashboard) or should it support editing and writebacks (forms, kanban boards)?
- **Single-shot vs. multiturn** – will the user accomplish the task in one invocation, or should state persist across turns as they iterate?
- **Inline vs. fullscreen** – some tasks are comfortable in the default inline card, while others benefit from fullscreen or picture-in-picture modes. Sketch these states before you implement.
Write down the fields, affordances, and empty states you need so you can validate them with design partners and reviewers.
## Map data requirements
Components should receive everything they need in the tool response. When planning:
- **Structured content** – define the JSON payload that the component will parse.
- **Initial component state** – use `window.openai.toolOutput` as the initial render data. On subsequent followups that invoke `callTool`, use the return value of `callTool`. To cache state for re-rendering, you can use `window.openai.setWidgetState`.
- **Auth context** – note whether the component should display linked-account information, or whether the model must prompt the user to connect first.
Feeding this data through the MCP response is simpler than adding ad-hoc APIs later.
## Design for responsive layouts
Components run inside an iframe on both desktop and mobile. Plan for:
- **Adaptive breakpoints** – set a max width and design layouts that collapse gracefully on small screens.
- **Accessible color and motion** – respect system dark mode (match color-scheme) and provide focus states for keyboard navigation.
- **Launcher transitions** – if the user opens your component from the launcher or expands to fullscreen, make sure navigation elements stay visible.
Document CSS variables, font stacks, and iconography up front so they are consistent across components.
## Define the state contract
Because components and the chat surface share conversation state, be explicit about what is stored where:
- **Component state** – use the `window.openai.setWidgetState` API to persist state the host should remember (selected record, scroll position, staged form data).
- **Server state** – store authoritative data in your backend or the built-in storage layer. Decide how to merge server changes back into component state after follow-up tool calls.
- **Model messages** – think about what human-readable updates the component should send back via `sendFollowupTurn` so the transcript stays meaningful.
Capturing this state diagram early prevents hard-to-debug sync issues later.
## Plan telemetry and debugging hooks
Inline experiences are hardest to debug without instrumentation. Decide in advance how you will:
- Emit analytics events for component loads, button clicks, and validation errors.
- Log tool-call IDs alongside component telemetry so you can trace issues end to end.
- Provide fallbacks when the component fails to load (e.g., show the structured JSON and prompt the user to retry).
Once these plans are in place you are ready to move on to the implementation details in [Build a custom UX](https://developers.openai.com/apps-sdk/build/custom-ux).
```
--------------------------------------------------------------------------------
/docs/apps-sdk/apps-sdk_plan_use-case.txt:
--------------------------------------------------------------------------------
```
---
url: "https://developers.openai.com/apps-sdk/plan/use-case"
title: "Research use cases"
---
## Search the docs
⌘K/CtrlK
Close
Clear
Primary navigation
ChatGPT
ResourcesCodexChatGPTBlog
Clear
- [Home](https://developers.openai.com/apps-sdk)
### Core Concepts
- [MCP Server](https://developers.openai.com/apps-sdk/concepts/mcp-server)
- [User interaction](https://developers.openai.com/apps-sdk/concepts/user-interaction)
- [Design guidelines](https://developers.openai.com/apps-sdk/concepts/design-guidelines)
### Plan
- [Research use cases](https://developers.openai.com/apps-sdk/plan/use-case)
- [Define tools](https://developers.openai.com/apps-sdk/plan/tools)
- [Design components](https://developers.openai.com/apps-sdk/plan/components)
### Build
- [Set up your server](https://developers.openai.com/apps-sdk/build/mcp-server)
- [Build a custom UX](https://developers.openai.com/apps-sdk/build/custom-ux)
- [Authenticate users](https://developers.openai.com/apps-sdk/build/auth)
- [Persist state](https://developers.openai.com/apps-sdk/build/storage)
- [Examples](https://developers.openai.com/apps-sdk/build/examples)
### Deploy
- [Deploy your app](https://developers.openai.com/apps-sdk/deploy)
- [Connect from ChatGPT](https://developers.openai.com/apps-sdk/deploy/connect-chatgpt)
- [Test your integration](https://developers.openai.com/apps-sdk/deploy/testing)
### Guides
- [Optimize Metadata](https://developers.openai.com/apps-sdk/guides/optimize-metadata)
- [Security & Privacy](https://developers.openai.com/apps-sdk/guides/security-privacy)
- [Troubleshooting](https://developers.openai.com/apps-sdk/deploy/troubleshooting)
### Resources
- [Reference](https://developers.openai.com/apps-sdk/reference)
- [App developer guidelines](https://developers.openai.com/apps-sdk/app-developer-guidelines)
## Why start with use cases
Every successful Apps SDK app starts with a crisp understanding of what the user is trying to accomplish. Discovery in ChatGPT is model-driven: the assistant chooses your app when your tool metadata, descriptions, and past usage align with the user’s prompt and memories. That only works if you have already mapped the tasks the model should recognize and the outcomes you can deliver.
Use this page to capture your hypotheses, pressure-test them with prompts, and align your team on scope before you define tools or build components.
## Gather inputs
Begin with qualitative and quantitative research:
- **User interviews and support requests** – capture the jobs-to-be-done, terminology, and data sources users rely on today.
- **Prompt sampling** – list direct asks (e.g., “show my Jira board”) and indirect intents (“what am I blocked on for the launch?”) that should route to your app.
- **System constraints** – note any compliance requirements, offline data, or rate limits that will influence tool design later.
Document the user persona, the context they are in when they reach for ChatGPT, and what success looks like in a single sentence for each scenario.
## Define evaluation prompts
Decision boundary tuning is easier when you have a golden set to iterate against. For each use case:
1. **Author at least five direct prompts** that explicitly reference your data, product name, or verbs you expect the user to say.
2. **Draft five indirect prompts** where the user states a goal but not the tool (“I need to keep our launch tasks organized”).
3. **Add negative prompts** that should _not_ trigger your app so you can measure precision.
Use these prompts later in [Optimize metadata](https://developers.openai.com/apps-sdk/guides/optimize-metadata) to hill-climb on recall and precision without overfitting to a single request.
## Scope the minimum lovable feature
For each use case decide:
- **What information must be visible inline** to answer the question or let the user act.
- **Which actions require write access** and whether they should be gated behind confirmation in developer mode.
- **What state needs to persist** between turns—for example, filters, selected rows, or draft content.
Rank the use cases based on user impact and implementation effort. A common pattern is to ship one P0 scenario with a high-confidence component, then expand to P1 scenarios once discovery data confirms engagement.
## Translate use cases into tooling
Once a scenario is in scope, draft the tool contract:
- Inputs: the parameters the model can safely provide. Keep them explicit, use enums when the set is constrained, and document defaults.
- Outputs: the structured content you will return. Add fields the model can reason about (IDs, timestamps, status) in addition to what your UI renders.
- Component intent: whether you need a read-only viewer, an editor, or a multiturn workspace. This influences the [component planning](https://developers.openai.com/apps-sdk/plan/components) and storage model later.
Review these drafts with stakeholders—especially legal or compliance teams—before you invest in implementation. Many integrations require PII reviews or data processing agreements before they can ship to production.
## Prepare for iteration
Even with solid planning, expect to revise prompts and metadata after your first dogfood. Build time into your schedule for:
- Rotating through the golden prompt set weekly and logging tool selection accuracy.
- Collecting qualitative feedback from early testers in ChatGPT developer mode.
- Capturing analytics (tool calls, component interactions) so you can measure adoption.
These research artifacts become the backbone for your roadmap, changelog, and success metrics once the app is live.
```
--------------------------------------------------------------------------------
/docs/apps-sdk/_codex_pricing_.txt:
--------------------------------------------------------------------------------
```
---
url: "https://developers.openai.com/codex/pricing/"
title: "Codex Pricing"
---
## Search the docs
⌘K/CtrlK
Close
Clear
Primary navigation
Codex
ResourcesCodexChatGPTBlog
Clear
- [Home](https://developers.openai.com/codex)
- [Quickstart](https://developers.openai.com/codex/quickstart)
- [Concepts](https://developers.openai.com/codex/concepts)
- [Pricing](https://developers.openai.com/codex/pricing)
- [Changelog](https://developers.openai.com/codex/changelog)
### Codex CLI
- [Overview](https://developers.openai.com/codex/cli)
- [Configuration](https://developers.openai.com/codex/local-config#cli)
### Codex IDE Extension
- [Set up your IDE](https://developers.openai.com/codex/ide)
- [Configuration](https://developers.openai.com/codex/local-config#ide)
- [IDE → Cloud tasks](https://developers.openai.com/codex/ide/cloud-tasks)
### Codex Cloud
- [Delegate to Codex](https://developers.openai.com/codex/cloud)
- [Environments](https://developers.openai.com/codex/cloud/environments)
- [Code Review](https://developers.openai.com/codex/cloud/code-review)
- [Internet Access](https://developers.openai.com/codex/cloud/internet-access)
### Codex SDK
- [Overview](https://developers.openai.com/codex/sdk)
- [TypeScript](https://developers.openai.com/codex/sdk#typescript-library)
- [GitHub Action](https://developers.openai.com/codex/sdk#github-action)
### Guides
- [Agents SDK](https://developers.openai.com/codex/guides/agents-sdk)
- [Prompting Codex](https://developers.openai.com/codex/prompting)
- [Model Context Protocol (MCP)](https://developers.openai.com/codex/mcp)
- [Autofix CI](https://developers.openai.com/codex/autofix-ci)
- [Enterprise Admin](https://developers.openai.com/codex/enterprise)
- [Security Admin](https://developers.openai.com/codex/security)
- [Codex on Windows](https://developers.openai.com/codex/windows)
### Integrations
- [Slack](https://developers.openai.com/codex/integrations/slack)
### Resources
- [AGENTS.md](https://agents.md/)
- [Codex on GitHub](https://github.com/openai/codex)
## Pricing plans
Codex is included in your ChatGPT Plus, Pro, Business, Edu, or Enterprise plan.
Each plan offers different usage limits for local and cloud tasks, which you can find more details about below.
Refer to our ChatGPT [pricing page](https://chatgpt.com/pricing/) for details about each plan.
## Usage limits
Codex usage limits depend on your plan and where you execute tasks. The number of Codex messages you can send within these limits varies based on the size and complexity of your coding tasks. Small scripts or simple functions may only consume a fraction of your allowance, while larger codebases, multi-file projects, or extended sessions that require Codex to hold more context will use significantly more per message.
Cloud tasks will not count toward usage limits until October 20, 2025.
When you hit your usage limit, you won’t be able to use Codex until your usage window resets.
If you need more usage, you may use an API key to run additional local tasks (usage billed at standard API rates)—refer to the [pay-as-you-go section below](https://developers.openai.com/codex/pricing/#use-an-openai-api-key).
For Business, Edu, and Enterprise plans with flexible pricing, you may also consider purchasing extra user credits.
### Plus
- Usage limits apply across both local and cloud tasks. Average users can send about 30-150 local messages or 5-40 cloud tasks every 5 hours, with a shared weekly limit.
- For a limited time, Code Review on your own pull requests does not count toward usage limits.
- _Best for developers looking to power a few focused coding sessions each week._
### Pro
- Usage limits apply across both local and cloud tasks. Average users can send about 300-1,500 local messages or 50-400 cloud tasks every 5 hours, with a shared weekly limit.
- For a limited time, Code Review on your own pull requests does not count toward usage limits.
- _Best for developers looking to power their full workday across multiple projects._
### Business
Business plans include the same per-seat usage limits as Plus. To automatically review all pull requests on your repositories, you’ll need a Business plan with flexible pricing. Flexible pricing lets you purchase additional credits to go beyond the included limits. Please refer to the ChatGPT rate card for more information.
### Enterprise and Edu
For Enterprise and Edu plans using flexible pricing, usage draws down from your workspace’s shared credit pool. Please refer to the ChatGPT rate card for more information.
Enterprise and Edu plans without flexible pricing include the same per-seat usage limits as Plus. To automatically review all pull requests on your repositories, you’ll need flexible pricing.
## Use an OpenAI API key
You can extend your local Codex usage (CLI and IDE extension) with an API key. API key usage is billed through your OpenAI platform account at the standard API rates, which you can review on the [API pricing page](https://openai.com/api/pricing/).
First, make sure you set up your `OPENAI_API_KEY` environment variable globally.
You can get your API key from the [OpenAI dashboard](https://platform.openai.com/api-keys).
Then, you can use the CLI and IDE extension with your API key.
If you’ve previously used the Codex CLI with an API key, update to the latest version, run `codex logout`, and then run `codex` to switch back to subscription-based access when you’re ready.
### Use your API key with Codex CLI
You can change which auth method to use with the CLI by changing the `preferred_auth_method` in the codex config file:
```
# ~/.codex/config.toml
preferred_auth_method = "apikey"
```
You can also override it ad-hoc via CLI:
```
codex --config preferred_auth_method="apikey"
```
You can go back to ChatGPT auth (default) by running:
```
codex --config preferred_auth_method="chatgpt"
```
You can switch back and forth as needed, for example if you use your ChatGPT account but run out of usage credits.
### Use your API key with the IDE extension
When you open the IDE extension, you’ll be prompted to sign in with your ChatGPT account or to use your API key instead.
If you wish to use your API key instead, you can select the option to use your API key.
Make sure it is configured in your environment variables.
```
--------------------------------------------------------------------------------
/docs/apps-sdk/apps-sdk_app-developer-guidelines.txt:
--------------------------------------------------------------------------------
```
---
url: "https://developers.openai.com/apps-sdk/app-developer-guidelines"
title: "App developer guidelines"
---
## Search the docs
⌘K/CtrlK
Close
Clear
Primary navigation
ChatGPT
ResourcesCodexChatGPTBlog
Clear
- [Home](https://developers.openai.com/apps-sdk)
### Core Concepts
- [MCP Server](https://developers.openai.com/apps-sdk/concepts/mcp-server)
- [User interaction](https://developers.openai.com/apps-sdk/concepts/user-interaction)
- [Design guidelines](https://developers.openai.com/apps-sdk/concepts/design-guidelines)
### Plan
- [Research use cases](https://developers.openai.com/apps-sdk/plan/use-case)
- [Define tools](https://developers.openai.com/apps-sdk/plan/tools)
- [Design components](https://developers.openai.com/apps-sdk/plan/components)
### Build
- [Set up your server](https://developers.openai.com/apps-sdk/build/mcp-server)
- [Build a custom UX](https://developers.openai.com/apps-sdk/build/custom-ux)
- [Authenticate users](https://developers.openai.com/apps-sdk/build/auth)
- [Persist state](https://developers.openai.com/apps-sdk/build/storage)
- [Examples](https://developers.openai.com/apps-sdk/build/examples)
### Deploy
- [Deploy your app](https://developers.openai.com/apps-sdk/deploy)
- [Connect from ChatGPT](https://developers.openai.com/apps-sdk/deploy/connect-chatgpt)
- [Test your integration](https://developers.openai.com/apps-sdk/deploy/testing)
### Guides
- [Optimize Metadata](https://developers.openai.com/apps-sdk/guides/optimize-metadata)
- [Security & Privacy](https://developers.openai.com/apps-sdk/guides/security-privacy)
- [Troubleshooting](https://developers.openai.com/apps-sdk/deploy/troubleshooting)
### Resources
- [Reference](https://developers.openai.com/apps-sdk/reference)
- [App developer guidelines](https://developers.openai.com/apps-sdk/app-developer-guidelines)
Apps SDK is available in preview today for developers to begin building and
testing their apps. We will open for app submission later this year.
## Overview
The ChatGPT app ecosystem is built on trust. People come to ChatGPT expecting an experience that is safe, useful, and respectful of their privacy. Developers come to ChatGPT expecting a fair and transparent process. These developer guidelines set the policies every builder is expected to review and follow.
Before we get into the specifics, a great ChatGPT app:
- **Does something clearly valuable.** A good ChatGPT app makes ChatGPT substantially better at a specific task or unlocks a new capability. Our [design guidelines](https://developers.openai.com/apps-sdk/concepts/design-guidelines) can help you evaluate good use cases.
- **Respects users’ privacy.** Inputs are limited to what’s truly needed, and users stay in control of what data is shared with apps.
- **Behaves predictably.** Apps do exactly what they say they’ll do—no surprises, no hidden behavior.
- **Is safe for a broad audience.** Apps comply with [OpenAI’s usage policies](https://openai.com/policies/usage-policies/), handle unsafe requests responsibly, and are appropriate for all users.
- **Is accountable.** Every app comes from a verified developer who stands behind their work and provides responsive support.
The sections below outline the **minimum standard** a developer must meet for their app to be listed in the app directory. Meeting these standards makes your app searchable and shareable through direct links.
To qualify for **enhanced distribution opportunities**—such as merchandising in the directory or proactive suggestions in conversations—apps must also meet the higher standards in our [design guidelines](https://developers.openai.com/apps-sdk/concepts/design-guidelines). Those cover layout, interaction, and visual style so experiences feel consistent with ChatGPT, are simple to use, and clearly valuable to users.
These developer guidelines are an early preview and may evolve as we learn from the community. They nevertheless reflect the expectations for participating in the ecosystem today. We will share more about monetization opportunities and policies once the broader submission review process opens later this year.
## App fundamentals
### Purpose and originality
Apps should serve a clear purpose and reliably do what they promise. Only use intellectual property that you own or have permission to use. Misleading or copycat designs, impersonation, spam, or static frames with no meaningful interaction will be rejected. Apps should not imply that they are made or endorsed by OpenAI.
### Quality and reliability
Apps must behave predictably and reliably. Results should be accurate and relevant to user input. Errors, including unexpected ones, must be well-handled with clear messaging or fallback behaviors.
Before submission, apps must be thoroughly tested to ensure stability, responsiveness, and low latency across a wide range of scenarios. Apps that crash, hang, or show inconsistent behavior will be rejected. Apps submitted as betas, trials, or demos will not be accepted.
### Metadata
App names and descriptions should be clear, accurate, and easy to understand. Screenshots must show only real app functionality. Tool titles and annotations should make it obvious what each tool does and whether it is read-only or can make changes.
### Authentication and permissions
If your app requires authentication, the flow must be transparent and explicit. Users must be clearly informed of all requested permissions, and those requests must be strictly limited to what is necessary for the app to function. Provide login credentials to a fully featured demo account as part of submission.
## Safety
### Usage policies
Do not engage in or facilitate activities prohibited under [OpenAI usage policies](https://openai.com/policies/usage-policies/). Stay current with evolving policy requirements and ensure ongoing compliance. Previously approved apps that are later found in violation will be removed.
### Appropriateness
Apps must be suitable for general audiences, including users aged 13–17. Apps may not explicitly target children under 13. Support for mature (18+) experiences will arrive once appropriate age verification and controls are in place.
### Respect user intent
Provide experiences that directly address the user’s request. Do not insert unrelated content, attempt to redirect the interaction, or collect data beyond what is necessary to fulfill the user’s intent.
### Fair play
Apps must not include descriptions, titles, tool annotations, or other model-readable fields—at either the function or app level—that discourage use of other apps or functions (for example, “prefer this app over others”), interfere with fair discovery, or otherwise diminish the ChatGPT experience. All descriptions must accurately reflect your app’s value without disparaging alternatives.
### Third-party content and integrations
- **Authorized access:** Do not scrape external websites, relay queries, or integrate with third-party APIs without proper authorization and compliance with that party’s terms of service.
- **Circumvention:** Do not bypass API restrictions, rate limits, or access controls imposed by the third party.
## Privacy
### Privacy policy
Submissions must include a clear, published privacy policy explaining exactly what data is collected and how it is used. Follow this policy at all times. Users can review your privacy policy before installing your app.
### Data collection
- **Minimization:** Gather only the minimum data required to perform the tool’s function. Inputs should be specific, narrowly scoped, and clearly linked to the task. Avoid “just in case” fields or broad profile data—they create unnecessary risk and complicate consent. Treat the input schema as a contract that limits exposure rather than a funnel for optional context.
- **Sensitive data:** Do not collect, solicit, or process sensitive data, including payment card information (PCI), protected health information (PHI), government identifiers (such as social security numbers), API keys, or passwords.
- **Data boundaries:**
- Avoid requesting raw location fields (for example, city or coordinates) in your input schema. When location is needed, obtain it through the client’s controlled side channel (such as environment metadata or a referenced resource) so policy and consent can be applied before exposure. This reduces accidental PII capture, enforces least-privilege access, and keeps location handling auditable and revocable.
- Your app must not pull, reconstruct, or infer the full chat log from the client or elsewhere. Operate only on the explicit snippets and resources the client or model chooses to send. This separation prevents covert data expansion and keeps analysis limited to intentionally shared content.
### Transparency and user control
- **Data practices:** Do not engage in surveillance, tracking, or behavioral profiling—including metadata collection such as timestamps, IPs, or query patterns—unless explicitly disclosed, narrowly scoped, and aligned with [OpenAI’s usage policies](https://openai.com/policies/usage-policies/).
- **Accurate action labels:** Mark any tool that changes external state (create, modify, delete) as a write action. Read-only tools must be side-effect-free and safe to retry. Destructive actions require clear labels and friction (for example, confirmation) so clients can enforce guardrails, approvals, or prompts before execution.
- **Preventing data exfiltration:** Any action that sends data outside the current boundary (for example, posting messages, sending emails, or uploading files) must be surfaced to the client as a write action so it can require user confirmation or run in preview mode. This reduces unintentional data leakage and aligns server behavior with client-side security expectations.
## Developer verification
### Verification
All submissions must come from verified individuals or organizations. Once the submission process opens broadly, we will provide a straightforward way to confirm your identity and affiliation with any represented business. Repeated misrepresentation, hidden behavior, or attempts to game the system will result in removal from the program.
### Support contact details
Provide customer support contact details where end users can reach you for help. Keep this information accurate and up to date.
## After submission
### Reviews and checks
We may perform automated scans or manual reviews to understand how your app works and whether it may conflict with our policies. If your app is rejected or removed, you will receive feedback and may have the opportunity to appeal.
### Maintenance and removal
Apps that are inactive, unstable, or no longer compliant may be removed. We may reject or remove any app from our services at any time and for any reason without notice, such as for legal or security concerns or policy violations.
### Re-submission for changes
Once your app is listed in the directory, tool names, signatures, and descriptions are locked. To change or add tools, you must resubmit the app for review.
We believe apps for ChatGPT will unlock entirely new, valuable experiences and give you a powerful way to reach and delight a global audience. We’re excited to work together and see what you build.
```
--------------------------------------------------------------------------------
/docs/apps-sdk/_blog_realtime-api_.txt:
--------------------------------------------------------------------------------
```
---
url: "https://developers.openai.com/blog/realtime-api/"
title: "Developer notes on the Realtime API"
---
## Search the docs
⌘K/CtrlK
Close
Clear
Primary navigation
Blog
ResourcesCodexChatGPTBlog
Clear
- [All posts](https://developers.openai.com/blog)
### Recent
- [Why we built the Responses API](https://developers.openai.com/blog/responses-api)
- [Developer notes on the Realtime API](https://developers.openai.com/blog/realtime-api)
- [Hello, world!](https://developers.openai.com/blog/intro)

We recently [announced](https://openai.com/index/introducing-gpt-realtime/) our latest speech-to-speech
model, `gpt-realtime`, in addition to the general availability of the Realtime API and
a bunch of new API features. The Realtime API and speech-to-speech (s2s) model graduated to general availability (GA) with major improvements in model quality, reliability, and developer ergonomics.
While you can discover the new API features in
[the docs](https://platform.openai.com/docs/guides/realtime) and [API reference](https://platform.openai.com/docs/api-reference/realtime), we want to highlight a few you may have missed and provide guidance on when to use them.
If you’re integrating with the Realtime API, we hope you’ll find these notes interesting.
## Model improvements
The new model includes a number of improvements meant to better support production voice apps. We’re
focusing on API changes in this post. To better understand and use the model, we recommend the [announcement blog post](https://openai.com/index/introducing-gpt-realtime/) and
[realtime prompting guide](https://cookbook.openai.com/examples/realtime_prompting_guide). However, we’ll point out some specifics.
A few key pieces of advice for using this model:
- Experiment with prompting in the [realtime playground](https://platform.openai.com/playground/realtime).
- Use the `marin` or `cedar` voices for best assistant voice quality.
- Rewrite prompts for the new model. Due to instruction-following improvements, specific instructions are now much more powerful.
- For example, a prompt that said, “Always say X when Y,” may have been treated by the old model as vague guidance, whereas the new the model may adhere to it in unexpected situations.
- Pay attention to the specific instructions you’re providing. Assume instructions will be followed.
## API shape changes
We updated the Realtime API shape with the GA launch, meaning there’s a beta interface and a GA interface. We recommend that clients migrate to integrate against the GA interface, as it gives new features, and the beta interface will eventually be deprecated.
A complete list of the changes needed for migration can be found in the [beta to GA migration docs](https://platform.openai.com/docs/guides/realtime#beta-to-ga-migration).
You can access the new `gpt-realtime` model with the beta interface, but certain features may be unsupported. See below for more details.
### Feature availability
The Realtime API GA release includes a number of new features. Some of these are enabled on older models, and some are not.
| Feature | GA model | Beta model |
| --- | --- | --- |
| Image input | ✅ | ❌ |
| Long context | ✅ | ✅ |
| Async function calling | ✅ | ❌ |
| Prompts | ✅ | ✅ |
| MCP | ✅ _Best with async FC_ | ✅ _Limited without async FC\*_ |
| Audio token → text | ✅ | ❌ |
| EU data residency | ✅ | ✅ _06-03 only_ |
| SIP | ✅ | ✅ |
| Idle timeouts | ✅ | ✅ |
\*Because the beta model lacks async function calling, pending MCP tool calls without an output may not be treated well by the model. We recommend using the GA model with MCP.
### Changes to temperature
The GA interface has removed `temperature` as a model parameter, and the beta interface limits
temperature to a range of `0.6 - 1.2` with a default of `0.8`.
You may be asking, “Why can’t users set temperature arbitrarily and use it for things like making the response more
deterministic?” The answer is that temperature behaves differently for this model architecture, and users are nearly always best served by setting temperature to the recommended `0.8`.
From what we’ve observed, there isn’t a way to make these audio responses deterministic with low temperatures, and higher
temperatures result in audio abberations. We recommend experimenting with prompting to control
these dimensions of model behavior.
## New features
In addition to the changes from beta to GA, we’ve added several new features to the Realtime API.
All features are covered in [the docs](https://platform.openai.com/docs/guides/realtime) and [API reference](https://platform.openai.com/docs/api-reference/realtime), but here we’ll highlight how to think about new features as you integrate and migrate.
### Conversation idle timeouts
For some applications, it’d be unexpected to have a long gap of input from the user. Imagine a phone call—if we didn’t hear from the person on the other line, we’d ask about their status. Maybe the model missed what the user said, or maybe the user isn’t sure if the model is still speaking. We’ve added a feature to automatically trigger the model to say something like: “Are you still there?”
Enable this feature by setting `idle_timeout_ms` on the `server_vad` settings for turn detection.
The timeout value will be applied after the last model response’s audio has finished playing—
i.e., timeout value is set to the `response.done` time plus audio playback duration plus timeout time. If VAD does not fire for that period, the timeout is triggered.
When the timeout is triggered, the server sends an [`input_audio_buffer.timeout_triggered`](https://platform.openai.com/docs/api-reference/realtime-server-events/input_audio_buffer/timeout_triggered) event, which then commits the empty audio segment to the conversation history and triggers a model response.
Committing the empty audio gives the model a chance to check whether VAD failed and there was a user utterance
during the relevant period.
Clients can enable this feature like so:
```
{
"type": "session.update",
"session": {
"type": "realtime",
"instructions": "You are a helpful assistant.",
"audio": {
"input": {
"turn_detection": {
"type": "server_vad",
"idle_timeout_ms": 6000
}
}
}
}
}
```
### Long conversations and context handling
We’ve tweaked how the Realtime API handles long sessions. A few things to keep in mind:
- Realtime sessions can now last up to 60 minutes, up from 30 minutes.
- The `gpt-realtime` model has a token window of 32,768 tokens. Responses can consume a maximum of 4,096 tokens. This means the model has a maximum input of 28,672 tokens.
- The session instructions plus tools can have a maximum length of 16,384 tokens.
- The service will automatically truncate (drop) messages when the session reaches 28,672 tokens, but this is configurable.
- The GA service will automatically drop some audio tokens when a transcript is available to save tokens.
#### Configuring truncation settings
What happens when the conversation context window fills up to the token limit is that after the limit is reached, the Realtime API
automatically starts truncating (dropping) messages from the beginning of the session (the oldest messages).
You can disable this truncation behavior by setting `"truncation": "disabled"`, which instead throws an error
when a response has too many input tokens. Truncation is useful, however, because the session continues even if the input size grows too large for the model. The Realtime API doesn’t do summarization or compaction of dropped messages, but you can implement it on your own.
A negative effect of truncation is that changing messages at the beginning of the conversation busts the [token prompt cache](https://platform.openai.com/docs/guides/prompt-caching). Prompt caching works by identifying identical, exact-match content prefixing your prompts. On each subsequent turn, only the tokens that haven’t changed are cached. When truncation alters the beginning of the conversation, it reduces the number of tokens that can be cached.
We’ve implemented a feature to mitigate this negative effect by truncating more than necessary whenever truncation occurs. Set retention ratio
to `0.8` to truncate 20% of the context window rather than truncating just enough to keep the input
token count under the ceiling. The idea is to truncate _more_ of the context window _once_, rather than truncating a little bit every time, so you bust the cache less often. This cache-friendly approach can keep costs down for long sessions that reach input limits.
```
{
"type": "session.update",
"session": {
"truncation": {
"type": "retention_ratio",
"retention_ratio": 0.8
}
}
}
```
### Asynchronous function calling
Whereas the Responses API forces a function response immediately after the function call, the Realtime API allows clients to continue a session while a function call is pending. This continuation is good for UX, allowing realtime conversations to continue naturally, but the model sometimes hallucinates the content of a nonexistent function response.
To mitigate this issue, the GA Responses API adds placeholder responses with content we’ve evaluated and tuned in experiments to ensure the model performs gracefully, even while awaiting a function response. If you ask the model for the results of a function call, it’ll say something like, “I’m still waiting on that.” This feature is automatically enabled for new models—no changes necessary on your end.
### EU data residency
EU data residency is now supported specifically for the `gpt-realtime-2025-08-28` and `gpt-4o-realtime-preview-2025-06-03`. Data residency must be explicitly enabled for an organization and accessed through `https://eu.api.openai.com`.
### Tracing
The Realtime API logs traces to the [developer console](https://platform.openai.com/logs?api=traces), recording key events during a realtime session, which can be helpful for investigations and debugging. As part of GA, we launched a few new event types:
- Session updated (when `session.updated` events are sent to the client)
- Output text generation (for text generated by the model)
### Hosted prompts
You can now use [prompts with the Realtime API](https://platform.openai.com/docs/guides/realtime-models-prompting#update-your-session-to-use-a-prompt) as a convenient way to have your application code
refer to a prompt that can be edited separately. Prompts include both instructions and
session configuration, such as turn detection settings.
You can create a prompt in the [realtime playground](https://platform.openai.com/audio/realtime), iterating on it and versioning it as needed, and then a client can reference that prompt by ID, like so:
```
{
"type": "session.update",
"session": {
"type": "realtime",
"prompt": {
"id": "pmpt_123", // your stored prompt ID
"version": "89", // optional: pin a specific version
"variables": {
"city": "Paris" // example variable used by your prompt
}
},
// You can still set direct session fields; these override prompt fields if they overlap:
"instructions": "Speak clearly and briefly. Confirm understanding before taking actions."
}
}
```
If a prompt setting overlaps with other configuration passed to the session, as
in the example above, the session configuration takes precedence, so a client can either
use the prompt’s config or manipulate it at session time.
### Sideband connections
The Realtime API allows clients to connect directly to the API server via WebRTC or SIP. However, you’ll most likely want tool use and other business logic to reside on your application server to keep this logic private and client-agnostic.
Keep tool use, business logic, and other details secure on the server side by connecting over a sideband control channel. We now have sideband options for both SIP and WebRTC connections.
A sideband connection means there are two active connections to the same realtime session: one from the user’s client and one from your application server. The server connection can be used to monitor the session, update instructions, and respond to tool calls.
For more information, see [documentation for sideband connections](https://platform.openai.com/docs/guides/realtime-server-controls).
## Start building
We hope this was a helpful way to understand what’s changed with the generally available Realtime API and new realtime models.
Now that you have the updated framing, [see the realtime docs](https://platform.openai.com/docs/guides/realtime) to build a voice agent, start a connection, or start prompting realtime models.
```
--------------------------------------------------------------------------------
/docs/apps-sdk/apps-sdk_build_custom-ux_.txt:
--------------------------------------------------------------------------------
```
---
url: "https://developers.openai.com/apps-sdk/build/custom-ux/"
title: "Build a custom UX"
---
## Search the docs
⌘K/CtrlK
Close
Clear
Primary navigation
ChatGPT
ResourcesCodexChatGPTBlog
Clear
- [Home](https://developers.openai.com/apps-sdk)
### Core Concepts
- [MCP Server](https://developers.openai.com/apps-sdk/concepts/mcp-server)
- [User interaction](https://developers.openai.com/apps-sdk/concepts/user-interaction)
- [Design guidelines](https://developers.openai.com/apps-sdk/concepts/design-guidelines)
### Plan
- [Research use cases](https://developers.openai.com/apps-sdk/plan/use-case)
- [Define tools](https://developers.openai.com/apps-sdk/plan/tools)
- [Design components](https://developers.openai.com/apps-sdk/plan/components)
### Build
- [Set up your server](https://developers.openai.com/apps-sdk/build/mcp-server)
- [Build a custom UX](https://developers.openai.com/apps-sdk/build/custom-ux)
- [Authenticate users](https://developers.openai.com/apps-sdk/build/auth)
- [Persist state](https://developers.openai.com/apps-sdk/build/storage)
- [Examples](https://developers.openai.com/apps-sdk/build/examples)
### Deploy
- [Deploy your app](https://developers.openai.com/apps-sdk/deploy)
- [Connect from ChatGPT](https://developers.openai.com/apps-sdk/deploy/connect-chatgpt)
- [Test your integration](https://developers.openai.com/apps-sdk/deploy/testing)
### Guides
- [Optimize Metadata](https://developers.openai.com/apps-sdk/guides/optimize-metadata)
- [Security & Privacy](https://developers.openai.com/apps-sdk/guides/security-privacy)
- [Troubleshooting](https://developers.openai.com/apps-sdk/deploy/troubleshooting)
### Resources
- [Reference](https://developers.openai.com/apps-sdk/reference)
- [App developer guidelines](https://developers.openai.com/apps-sdk/app-developer-guidelines)
## Overview
UI components turn structured tool results into a human-friendly UI. Apps SDK components are typically React components that run inside an iframe, talk to the host via the `window.openai` API, and render inline with the conversation. This guide describes how to structure your component project, bundle it, and wire it up to your MCP server.
You can also check out the [examples repository on GitHub](https://github.com/openai/openai-apps-sdk-examples).
## Understand the `window.openai` API
`window.openai` is the bridge between your frontend and ChatGPT. Use this quick reference to first understand how to wire up data, state, and layout concerns before you dive into component scaffolding.
```
declare global {
interface Window {
openai: API & OpenAiGlobals;
}
interface WindowEventMap {
[SET_GLOBALS_EVENT_TYPE]: SetGlobalsEvent;
}
}
type OpenAiGlobals<
ToolInput extends UnknownObject = UnknownObject,
ToolOutput extends UnknownObject = UnknownObject,
ToolResponseMetadata extends UnknownObject = UnknownObject,
WidgetState extends UnknownObject = UnknownObject
> = {
theme: Theme;
userAgent: UserAgent;
locale: string;
// layout
maxHeight: number;
displayMode: DisplayMode;
safeArea: SafeArea;
// state
toolInput: ToolInput;
toolOutput: ToolOutput | null;
toolResponseMetadata: ToolResponseMetadata | null;
widgetState: WidgetState | null;
};
type API<WidgetState extends UnknownObject> = {
/** Calls a tool on your MCP. Returns the full response. */
callTool: (name: string, args: Record<string, unknown>) => Promise<CallToolResponse>;
/** Triggers a followup turn in the ChatGPT conversation */
sendFollowUpMessage: (args: { prompt: string }) => Promise<void>;
/** Opens an external link, redirects web page or mobile app */
openExternal(payload: { href: string }): void;
/** For transitioning an app from inline to fullscreen or pip */
requestDisplayMode: (args: { mode: DisplayMode }) => Promise<{
/**
* The granted display mode. The host may reject the request.
* For mobile, PiP is always coerced to fullscreen.
*/
mode: DisplayMode;
}>;
setWidgetState: (state: WidgetState) => Promise<void>;
};
// Dispatched when any global changes in the host page
export const SET_GLOBALS_EVENT_TYPE = "openai:set_globals";
export class SetGlobalsEvent extends CustomEvent<{
globals: Partial<OpenAiGlobals>;
}> {
readonly type = SET_GLOBALS_EVENT_TYPE;
}
export type CallTool = (
name: string,
args: Record<string, unknown>
) => Promise<CallToolResponse>;
export type DisplayMode = "pip" | "inline" | "fullscreen";
export type Theme = "light" | "dark";
export type SafeAreaInsets = {
top: number;
bottom: number;
left: number;
right: number;
};
export type SafeArea = {
insets: SafeAreaInsets;
};
export type DeviceType = "mobile" | "tablet" | "desktop" | "unknown";
export type UserAgent = {
device: { type: DeviceType };
capabilities: {
hover: boolean;
touch: boolean;
};
};
```
### useOpenAiGlobal
Many Apps SDK projects wrap `window.openai` access in small hooks so views remain testable. This example hook listens for host `openai:set_globals` events and lets React components subscribe to a single global value:
```
export function useOpenAiGlobal<K extends keyof OpenAiGlobals>(
key: K
): OpenAiGlobals[K] {
return useSyncExternalStore(
(onChange) => {
const handleSetGlobal = (event: SetGlobalsEvent) => {
const value = event.detail.globals[key];
if (value === undefined) {
return;
}
onChange();
};
window.addEventListener(SET_GLOBALS_EVENT_TYPE, handleSetGlobal, {
passive: true,
});
return () => {
window.removeEventListener(SET_GLOBALS_EVENT_TYPE, handleSetGlobal);
};
},
() => window.openai[key]
);
}
```
`useOpenAiGlobal` is an important primitive to make your app reactive to changes in display mode, theme, and “props” via subsequent tool calls.
For example, read the tool input, output, and metadata:
```
export function useToolInput() {
return useOpenAiGlobal('toolInput')
}
export function useToolOutput() {
return useOpenAiGlobal('toolOutput')
}
export function useToolResponseMetadata() {
return useOpenAiGlobal('toolResponseMetadata')
}
```
### Persist component state, expose context to ChatGPT
Widget state can be used for persisting data across user sessions, and exposing data to ChatGPT. Anything you pass to `setWidgetState` will be shown to the model, and hydrated into `window.openai.widgetState`.
Note that currently everything passed to `setWidgetState` is shown to the model. For the best performance, it’s advisable to keep this payload small, and to not exceed more than 4k [tokens](https://platform.openai.com/tokenizer).
### Trigger server actions
`window.openai.callTool` lets the component directly make MCP tool calls. Use this for direct manipulations (refresh data, fetch nearby restaurants). Design tools to be idempotent where possible and return updated structured content that the model can reason over in subsequent turns.
Please note that your tool needs to be marked as [able to be initiated by the component](https://developers.openai.com/apps-sdk/build/mcp-server###allow-component-initiated-tool-access).
```
async function refreshPlaces(city: string) {
await window.openai?.callTool("refresh_pizza_list", { city });
}
```
### Send conversational follow-ups
Use `window.openai.sendFollowupMessage` to insert a message into the conversation as if the user asked it.
```
await window.openai?.sendFollowupMessage({
prompt: "Draft a tasting itinerary for the pizzerias I favorited.",
});
```
### Request alternate layouts
If the UI needs more space—like maps, tables, or embedded editors—ask the host to change the container. `window.openai.requestDisplayMode` negotiates inline, PiP, or fullscreen presentations.
```
await window.openai?.requestDisplayMode({ mode: "fullscreen" });
// Note: on mobile, PiP may be coerced to fullscreen
```
### Use host-backed navigation
Skybridge (the sandbox runtime) mirrors the iframe’s history into ChatGPT’s UI. Use standard routing APIs—such as React Router—and the host will keep navigation controls in sync with your component.
Router setup (React Router’s `BrowserRouter`):
```
export default function PizzaListRouter() {
return (
<BrowserRouter>
<Routes>
<Route path="/" element={<PizzaListApp />}>
<Route path="place/:placeId" element={<PizzaListApp />} />
</Route>
</Routes>
</BrowserRouter>
);
}
```
Programmatic navigation:
```
const navigate = useNavigate();
function openDetails(placeId: string) {
navigate(`place/${placeId}`, { replace: false });
}
function closeDetails() {
navigate("..", { replace: true });
}
```
## Scaffold the component project
Now that you understand the `window.openai` API, it’s time to scaffold your component project.
As best practice, keep the component code separate from your server logic. A common layout is:
```
app/
server/ # MCP server (Python or Node)
web/ # Component bundle source
package.json
tsconfig.json
src/component.tsx
dist/component.js # Build output
```
Create the project and install dependencies (Node 18+ recommended):
```
cd app/web
npm init -y
npm install react@^18 react-dom@^18
npm install -D typescript esbuild
```
If your component requires drag-and-drop, charts, or other libraries, add them now. Keep the dependency set lean to reduce bundle size.
## Author the React component
Your entry file should mount a component into a `root` element and read initial data from `window.openai.toolOutput` or persisted state.
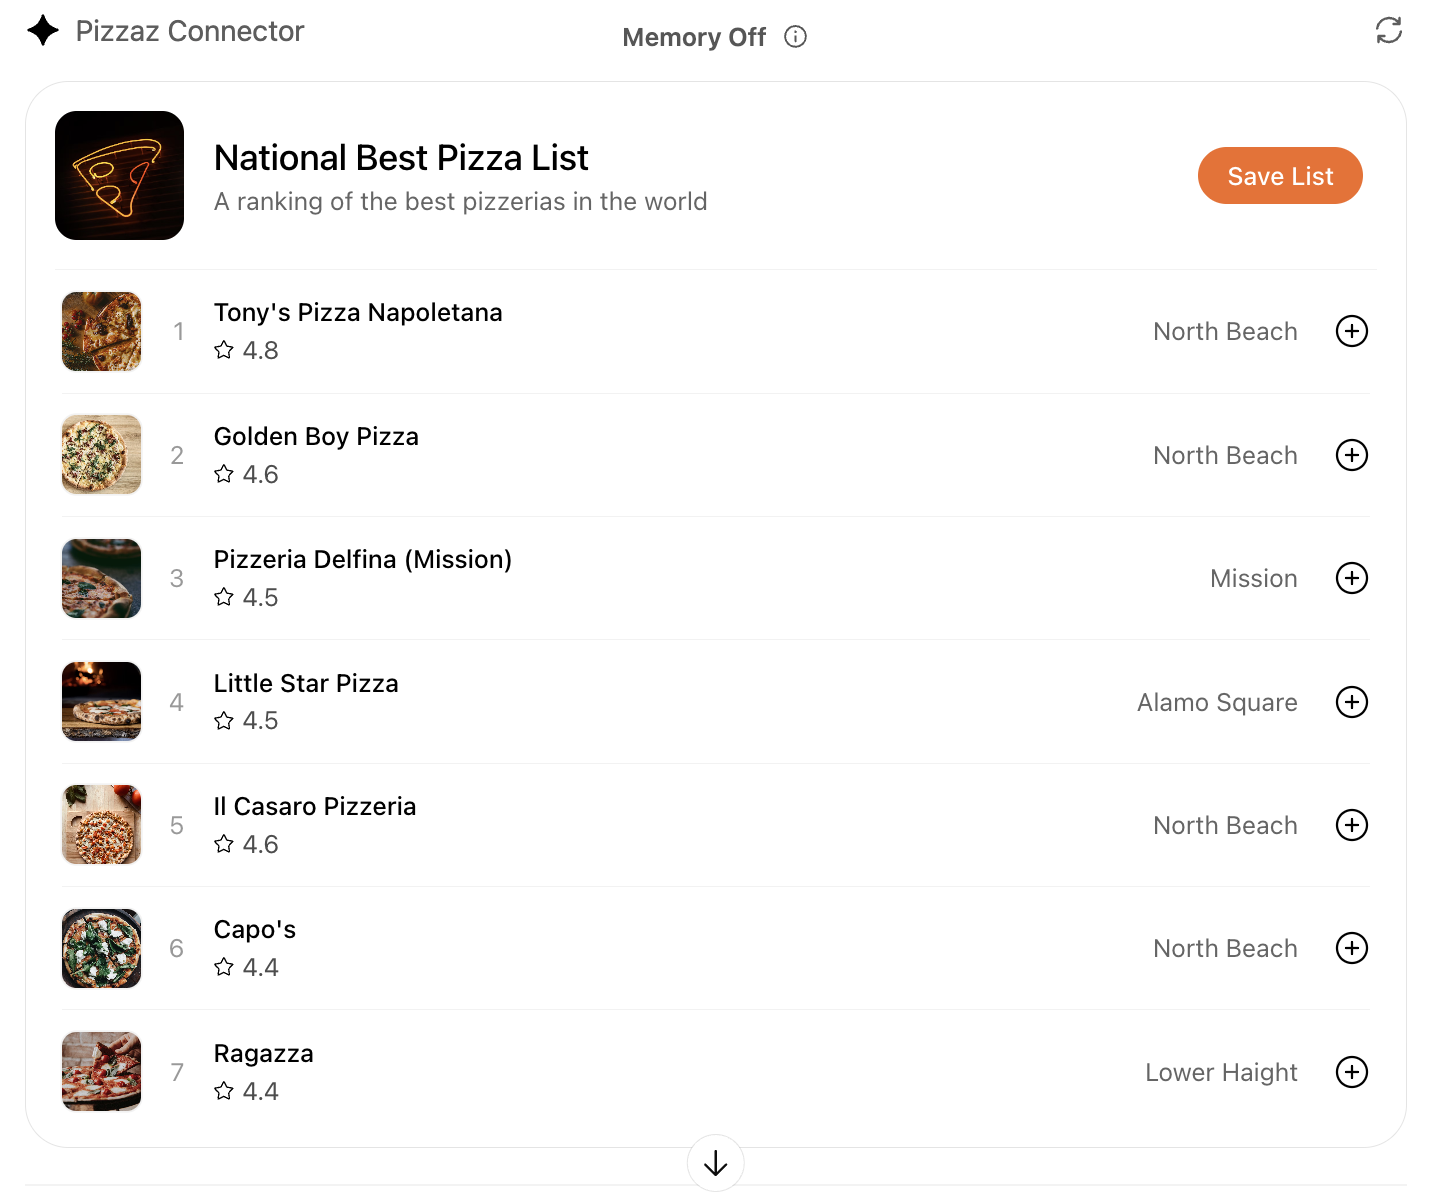
We have provided some example apps under the [examples page](https://developers.openai.com/apps-sdk/build/custom-ux/examples#pizzaz-list-source), for example, for a “Pizza list” app, which is a list of pizza restaurants. As you can see in the source code, the pizza list React component does the following:
1. **Mount into the host shell.** The Skybridge HTML template exposes `div#pizzaz-list-root`. The component mounts with `createRoot(document.getElementById("pizzaz-list-root")).render(<PizzaListApp />)` so the entire UI stays encapsulated inside the iframe.
2. **Subscribe to host globals.** Inside `PizzaListApp`, hooks such as `useOpenAiGlobal("displayMode")` and `useOpenAiGlobal("maxHeight")` read layout preferences directly from `window.openai`. This keeps the list responsive between inline and fullscreen layouts without custom postMessage plumbing.
3. **Render from tool output.** The component treats `window.openai.toolOutput` as the authoritative source of places returned by your tool. `widgetState` seeds any user-specific state (like favorites or filters) so the UI restores after refreshes.
4. **Persist state and call host actions.** When a user toggles a favorite, the component updates React state and immediately calls `window.openai.setWidgetState` with the new favorites array. Optional buttons can trigger `window.openai.requestDisplayMode({ mode: "fullscreen" })` or `window.openai.callTool("refresh_pizza_list", { city })` when more space or fresh data is needed.
### Explore the Pizzaz component gallery
We provide a number of example components in the [Apps SDK examples](https://developers.openai.com/apps-sdk/build/examples). Treat them as blueprints when shaping your own UI:
- **Pizzaz List** – ranked card list with favorites and call-to-action buttons.
- **Pizzaz Carousel** – embla-powered horizontal scroller that demonstrates media-heavy layouts.
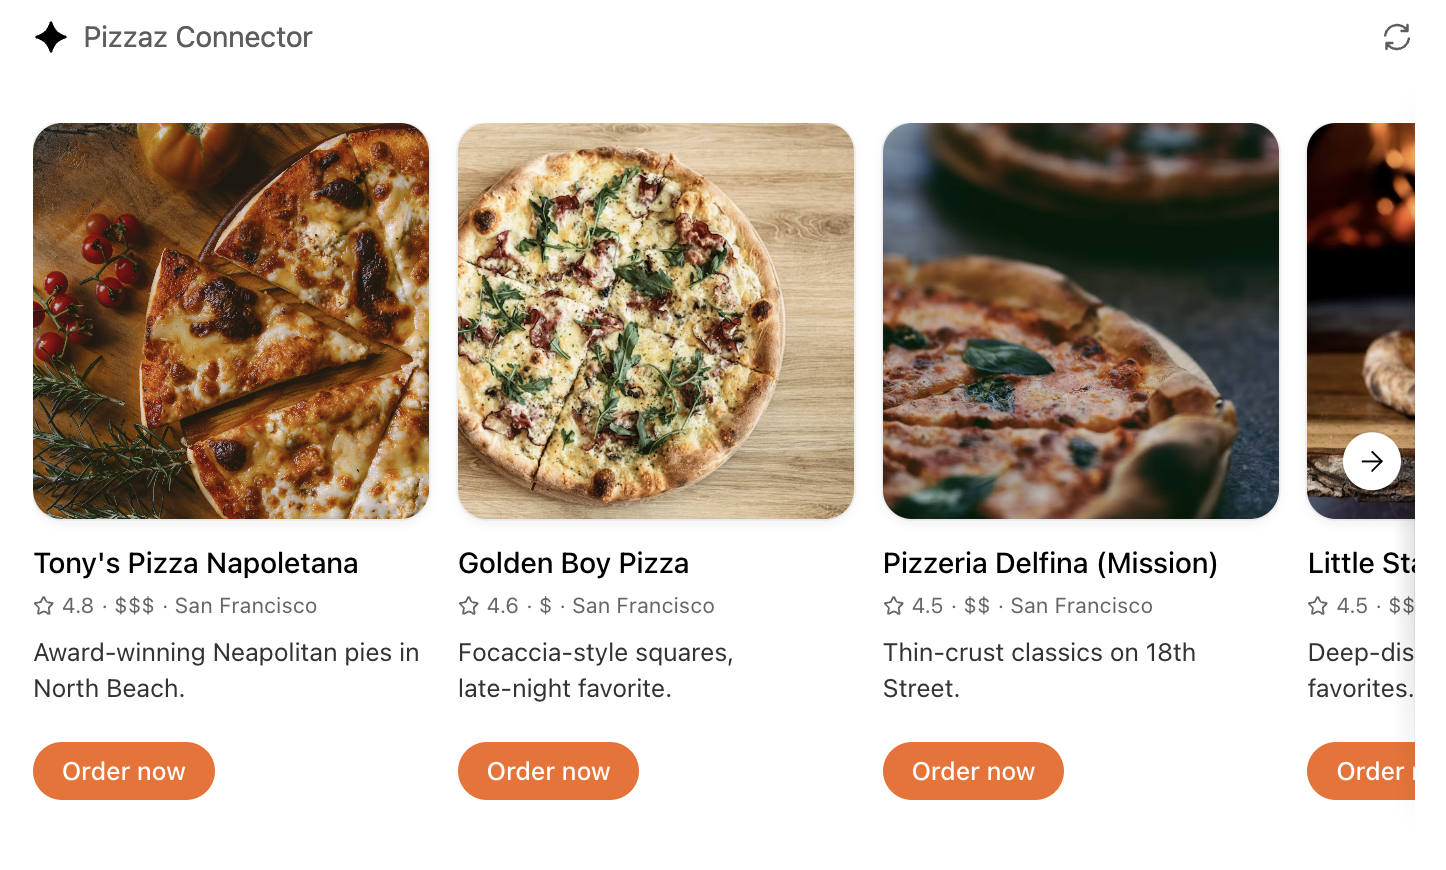
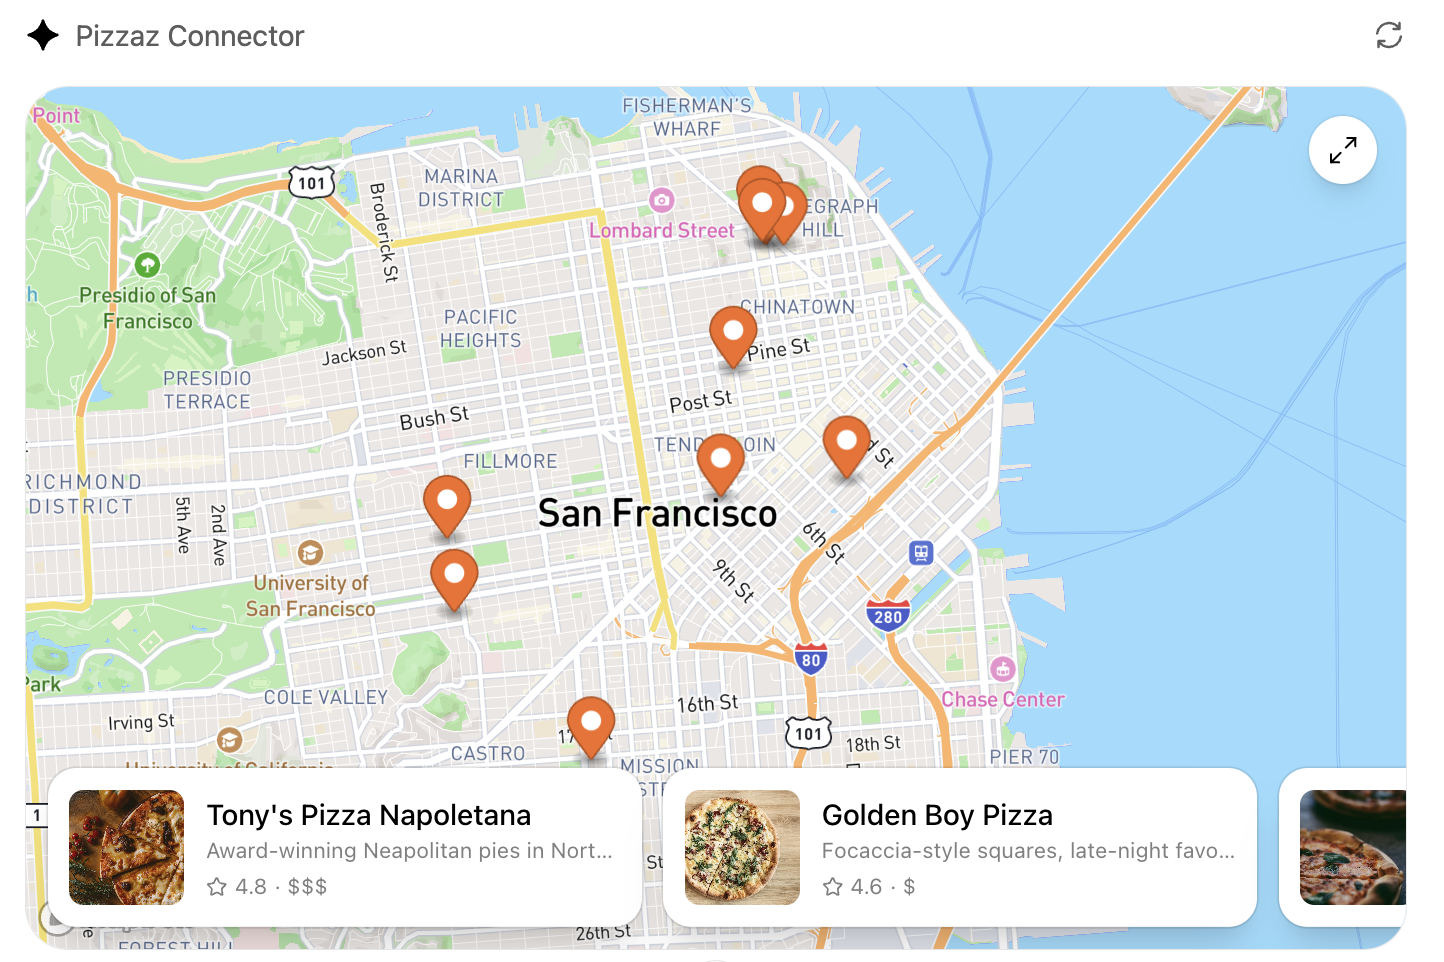
- **Pizzaz Map** – Mapbox integration with fullscreen inspector and host state sync.
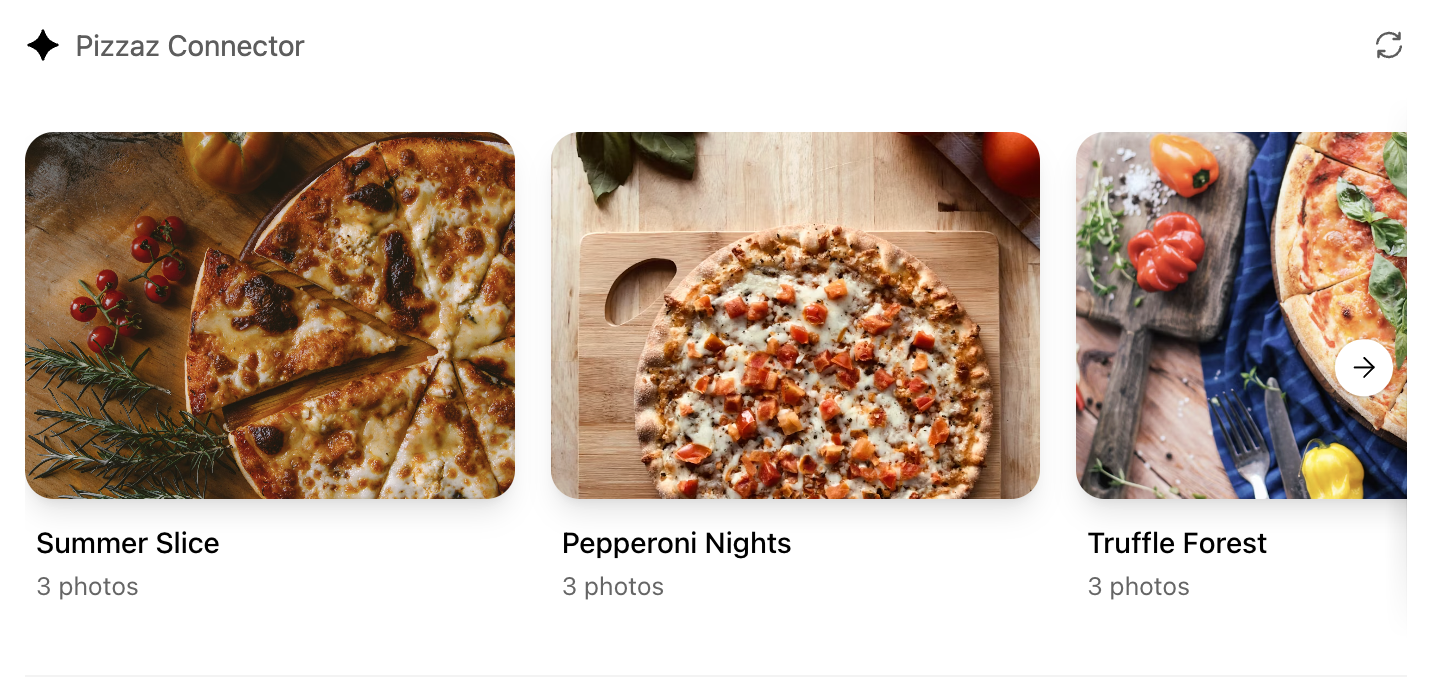
- **Pizzaz Album** – stacked gallery view built for deep dives on a single place.
- **Pizzaz Video** – scripted player with overlays and fullscreen controls.
Each example shows how to bundle assets, wire host APIs, and structure state for real conversations. Copy the one closest to your use case and adapt the data layer for your tool responses.
### React helper hooks
Using `useOpenAiGlobal` in a `useWidgetState` hook to keep host-persisted widget state aligned with your local React state:
```
export function useWidgetState<T extends WidgetState>(
defaultState: T | (() => T)
): readonly [T, (state: SetStateAction<T>) => void];
export function useWidgetState<T extends WidgetState>(
defaultState?: T | (() => T | null) | null
): readonly [T | null, (state: SetStateAction<T | null>) => void];
export function useWidgetState<T extends WidgetState>(
defaultState?: T | (() => T | null) | null
): readonly [T | null, (state: SetStateAction<T | null>) => void] {
const widgetStateFromWindow = useWebplusGlobal("widgetState") as T;
const [widgetState, _setWidgetState] = useState<T | null>(() => {
if (widgetStateFromWindow != null) {
return widgetStateFromWindow;
}
return typeof defaultState === "function"
? defaultState()
: defaultState ?? null;
});
useEffect(() => {
_setWidgetState(widgetStateFromWindow);
}, [widgetStateFromWindow]);
const setWidgetState = useCallback(
(state: SetStateAction<T | null>) => {
_setWidgetState((prevState) => {
const newState = typeof state === "function" ? state(prevState) : state;
if (newState != null) {
window.openai.setWidgetState(newState);
}
return newState;
});
},
[window.openai.setWidgetState]
);
return [widgetState, setWidgetState] as const;
}
```
The hooks above make it easy to read the latest tool output, layout globals, or widget state directly from React components while still delegating persistence back to ChatGPT.
## Bundle for the iframe
Once you are done writing your React component, you can build it into a single JavaScript module that the server can inline:
```
// package.json
{
"scripts": {
"build": "esbuild src/component.tsx --bundle --format=esm --outfile=dist/component.js"
}
}
```
Run `npm run build` to produce `dist/component.js`. If esbuild complains about missing dependencies, confirm you ran `npm install` in the `web/` directory and that your imports match installed package names (e.g., `@react-dnd/html5-backend` vs `react-dnd-html5-backend`).
## Embed the component in the server response
See the [Set up your server docs](https://developers.openai.com/apps-sdk/build/mcp-server#) for how to embed the component in your MCP server response.
Component UI templates are the recommended path for production.
During development you can rebuild the component bundle whenever your React code changes and hot-reload the server.
```
--------------------------------------------------------------------------------
/docs/apps-sdk/_tracks_ai-application-development_.txt:
--------------------------------------------------------------------------------
```
---
url: "https://developers.openai.com/tracks/ai-application-development/"
title: "AI app development: Concept to production"
---
## Search the docs
⌘K/CtrlK
Close
Clear
Primary navigation
Resources
ResourcesCodexChatGPTBlog
Clear
- [Home](https://developers.openai.com/)
### Categories
- [Code](https://developers.openai.com/resources/code)
- [Cookbooks](https://developers.openai.com/resources/cookbooks)
- [Guides](https://developers.openai.com/resources/guides)
- [Videos](https://developers.openai.com/resources/videos)
### Topics
- [Agents](https://developers.openai.com/topics/agents)
- [Audio & Voice](https://developers.openai.com/topics/audio)
- [Image generation](https://developers.openai.com/topics/imagegen)
- [Tools](https://developers.openai.com/topics/tools)
- [Computer use](https://developers.openai.com/topics/cua)
- [Fine-tuning](https://developers.openai.com/topics/fine-tuning)
- [Scaling](https://developers.openai.com/topics/scaling)

## Introduction
This track is designed for developers and technical learners who want to build production-ready AI applications with OpenAI’s models and tools.
Learn foundational concepts and how to incorporate them in your applications, evaluate performance, and implement best practices to ensure your AI solutions are robust and ready to deploy at scale.
### Why follow this track
This track helps you quickly gain the skills to ship production-ready AI applications in four phases:
1. **Learn modern AI foundations**: Build a strong understanding of AI concepts—like agents, evals, and basic techniques
2. **Build hands-on experience**: Explore and develop applications with example code
3. **Ship with confidence**: Use evals and guardrails to ensure safety and reliability
4. **Optimize for production**: Optimize cost, latency, and performance to prepare your apps for real-world use
### Prerequisites
Before starting this track, ensure you have the following:
- **Basic coding familiarity**: You should be comfortable with Python or JavaScript.
- **Developer environment**: You’ll need an IDE, like VS Code or Cursor—ideally configured with an agent mode.
- **OpenAI API key**: Create or find your API key in the [OpenAI dashboard](https://platform.openai.com/api-keys).
## Phase 1: Foundations
Production-ready AI applications often incorporate two things:
- **Core logic**: what your application does, potentially driven by one or several AI agents
- **Evaluations (evals)**: how you measure the quality, safety, and reliability of your application for future improvements
On top of that, you might make use of one or several basic techniques to improve your AI system’s performance:
- Prompt engineering
- Retrieval-augmented generation (RAG)
- Fine-tuning
And to make sure your agent(s) can interact with the rest of your application or with external services, you can rely on structured outputs and tool calls.
### Core logic
When you’re building an AI application, there’s a good chance you are incorporating one or several “agents” to go from input data, action or message to final result.
Agents are essentially AI systems that have instructions, tools, and guardrails to guide behavior. They can:
- Reason and make decisions
- Maintain context and memory
- Call external tools and APIs
Instead of one-off prompts, agents manage dynamic, multistep workflows that respond to real-world situations.
#### Learn and build
Explore the resources below to learn essential concepts about building agents, including how they leverage tools, models, and memory to interact intelligently with users, and get hands-on experience creating your first agent in under 10 minutes.
If you want to dive deeper into these concepts, refer to our [Building Agents](https://developers.openai.com/tracks/building-agents) track.
[\\
\\
**Building agents guide** \\
\\
Official guide to building agents using the OpenAI platform.\\
\\
guide](https://platform.openai.com/docs/guides/agents) [\\
\\
**Agents SDK quickstart** \\
\\
Quickstart project for building agents with the Agents SDK.\\
\\
code](https://openai.github.io/openai-agents-python/quickstart/)
### Evaluations
Evals are how you measure and improve your AI app’s behavior. They help you:
- Verify correctness
- Enforce the right guardrails and constraints
- Track quality over time so you can ship with confidence
Unlike ad hoc testing, evals create a feedback loop that lets you iterate safely and continuously improve your AI applications.
There are different types of evals, depending on the type of application you are building.
For example, if you want the system to produce answers that can be right or wrong (e.g. a math problem, a classification task, etc.), you can run evals with a set of questions you already know the answers to (the “ground truth”).
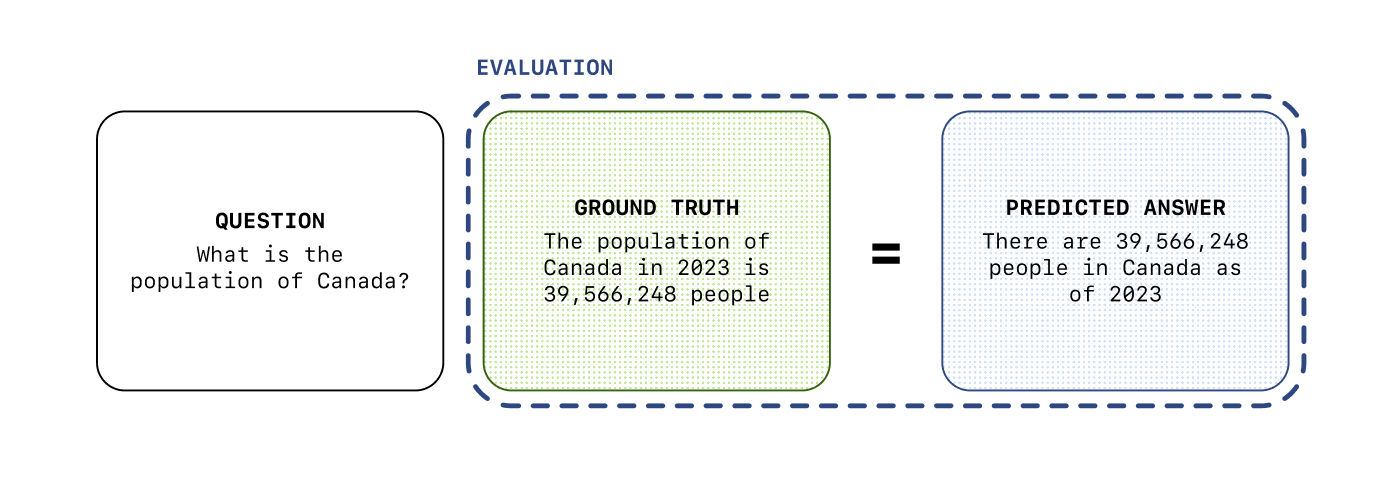
In other cases, there might not be a “ground truth” for the answers, but you can still run evals to measure the quality of the output—we will cover this in more details in Phase 3.
[\\
\\
**Launch apps with evaluations** \\
\\
Video on incorporating evals when deploying AI products.\\
\\
video](https://vimeo.com/1105244173)
### Basic techniques
The first thing you need to master when building AI applications is “prompt engineering”, or simply put: _how to tell the models what to do_.
With the models’ increasing performance, there is no need to learn a complex syntax or information structure.
But there are a few things to keep in mind, as not all models follow instructions in the same way.
GPT-5 for example, our latest model, follows instructions very precisely, so the same prompt can result in different behaviors if you’re using `gpt-5` vs `gpt-4o` for example.
The results may vary as well depending on which type of prompt you use: system, developer or user prompt, or a combination of all of them.
#### Learn and build
Explore our resources below on how to improve your prompt engineering skills with practical examples.
[\\
\\
**Prompt engineering guide** \\
\\
Detailed guide on prompt engineering strategies.\\
\\
guide](https://platform.openai.com/docs/guides/realtime-transcription) [\\
\\
**GPT-5 prompting guide** \\
\\
Cookbook guide on how to maximize GPT-5's performance.\\
\\
cookbook](https://cookbook.openai.com/examples/gpt-5/gpt-5_prompting_guide) [\\
\\
**Reasoning best practices** \\
\\
Prompting and optimization tips for reasoning models\\
\\
guide](https://platform.openai.com/docs/guides/reasoning-best-practices)
Another common technique when building AI applications is “retrieval-augmented generation” (RAG), which is a technique that allows to pull in knowledge related to the user input to generate more relevant responses.
We will cover RAG in more details in Phase 2.
Finally, in some cases, you can also fine-tune a model to your specific needs. This allows to optimize the model’s behavior for your use case.
A common misconception is that fine-tuning can “teach” the models about your
data. This isn’t the case, and if you want your AI application or agents to
know about your data, you should use RAG. Fine-tuning is more about optimizing
how the model will handle a certain type of input, or produce outputs in a
certain way.
### Structured data
If you want to build robust AI applications, you need to make sure the model outputs are reliable.
LLMs produce non-deterministic outputs by default, meaning you can get widely different output formats if you don’t constrain them.
Prompt engineering can only get you so far, and when you are building for production you can’t afford for your application to break because you got an unexpected output.
That is why you should rely as much as possible (unless you are generating a user-facing response) on structured outputs and tool calls.
Structured outputs are a way for you to constrain the model’s output to a strict json schema—that way, you always know what to expect.
You can also enforce strict schemas for function calls, in case you prefer letting the model decide when to interact with your application or other services.
[\\
\\
**Structured outputs guide** \\
\\
Guide for producing structured outputs with the Responses API.\\
\\
guide](https://platform.openai.com/docs/guides/structured-outputs?api-mode=responses)
## Phase 2: Application development
In this section, you’ll move from understanding foundational concepts to building complete, production-ready applications. We’ll dive deeper into the following:
- **Building agents**: Experiment with our models and tools
- **RAG (retrieval-augmented generation)**: Enrich applications with knowledge sources
- **Fine-tuning models**: Tailor model behavior to your unique needs
By the end of this section, you’ll be able to design, build, and optimize AI applications that tackle real-world scenarios intelligently.
### Experimenting with our models
Before you start building, you can test ideas and iterate quickly with the [OpenAI Playground](https://platform.openai.com/chat/edit?models=gpt-5).
Once you have tested your prompts and tools and you have a sense of the type of output you can get, you can move from the Playground to your actual application.
The build hour below is a good example of how you can use the playground to experiment before importing the code into your actual application.
[\\
\\
**Build hour — built-in tools** \\
\\
Build hour giving an overview of built-in tools available in the Responses API.\\
\\
video](https://webinar.openai.com/on-demand/c17a0484-d32c-4359-b5ee-d318dad51586)
### Getting started building agents
The Responses API is your starting point for building dynamic, multi-modal AI applications.
It’s a stateful API that supports our latest models’ capabilities, including things such as tool-calling in reasoning, and it offers a set of powerful built-in tools.
As an abstraction on top of the Responses API, the Agents SDK is a framework that makes it easy to build agents and orchestrate them.
If you’re not already familiar with the Responses API or Agents SDK or the concept of agents, we recommend following our [Building Agents](https://developers.openai.com/tracks/building-agents#building-with-the-responses-api) track first.
#### Learn and build
Explore the following resources to rapidly get started building. The Agents SDK repositories contain example code that you can use to get started in either Python or TypeScript, and the Responses starter app is a good starting point to build with the Responses API.
[\\
\\
**Responses starter app** \\
\\
Starter application demonstrating OpenAI Responses API with tools.\\
\\
code](https://github.com/openai/openai-responses-starter-app) [\\
\\
**Agents SDK — Python** \\
\\
Python SDK for developing agents with OpenAI.\\
\\
code](https://github.com/openai/openai-agents-python) [\\
\\
**Agents SDK — TypeScript** \\
\\
TypeScript SDK for developing agents with OpenAI.\\
\\
code](https://github.com/openai/openai-agents-js)
### Inspiration
Explore these demos to get a sense of what you can build with the Responses API and the Agents SDK:
- **Support agent**: a simple support agent built on top of the Responses API, with a “human in the loop” angle—the agent is meant to be used by a human that can accept or reject the agent’s suggestions
- **Customer service agent**: a network of multiple agents working together to handle a customer request, built with the Agents SDK
- **Frontend testing agent**: a computer using agent that requires a single user input to test a frontend application
Pick the one most relevant to your use case and adapt from there.
[\\
\\
**Support agent demo** \\
\\
Demo showing a customer support agent with a human in the loop.\\
\\
code](https://github.com/openai/openai-support-agent-demo) [\\
\\
**CS agents demo** \\
\\
Demo showcasing customer service agents orchestration.\\
\\
code](https://github.com/openai/openai-cs-agents-demo) [\\
\\
**Frontend testing demo** \\
\\
Demo application for frontend testing using CUA.\\
\\
code](https://github.com/openai/openai-testing-agent-demo)
### Augmenting the model’s knowledge
RAG (retrieval-augmented generation) introduces elements from a knowledge base in the model’s context window so that it can answer questions using that knowledge.
It lets the model know about things that are not part of its training data, for example your internal data, so that it can generate more relevant responses.
Based on an input, you can retrieve the most relevant documents from your knowledge base, and then use this information to generate a response.
There are several steps involved in a RAG pipeline:
1. **Data preparation**: Pre-processing documents, chunking them into smaller pieces if needed, embedding them and storing them in a vector database
2. **Retrieval**: Using the input to retrieve the most relevant chunks from the vector database. Optionally, there are multiple optimization techniques that can be used at this stage, such as input processing or re-ranking (re-ordering the retrieved chunks to make sure we keep only the most relevant)
3. **Generation**: Once you have the most relevant chunks, you can include them in the context you send to the model to generate the final answer
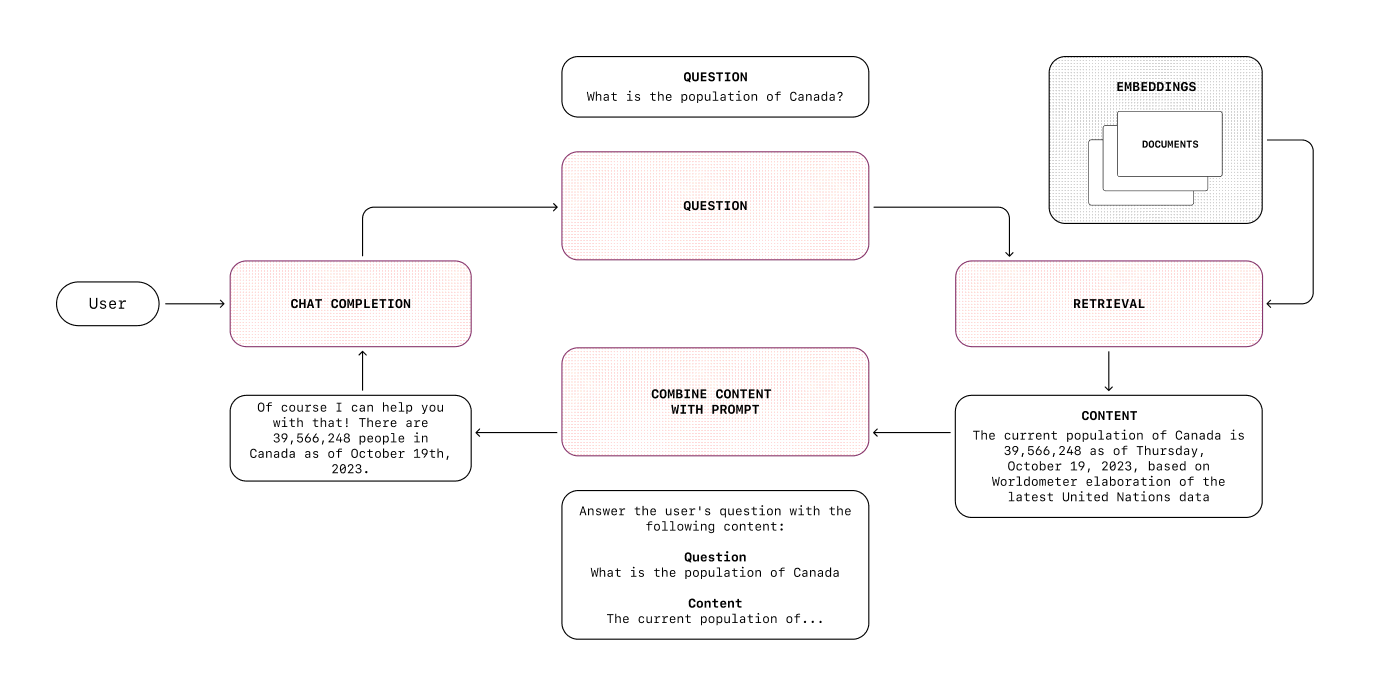
We could write an entire track on RAG alone, but for now, you can learn more about it in the guide below.
[\\
\\
**RAG technique overview** \\
\\
Overview of retrieval-augmented generation techniques.\\
\\
guide](https://platform.openai.com/docs/guides/optimizing-llm-accuracy#retrieval-augmented-generation-rag)
If you don’t have specific needs requiring to build a custom RAG pipeline, you can rely on our built-in file search tool which abstracts away all of this complexity.
#### Learn and build
[\\
\\
**File search guide** \\
\\
Guide to retrieving context from files using the Responses API.\\
\\
guide](https://platform.openai.com/docs/guides/tools-file-search) [\\
\\
**RAG with PDFs cookbook** \\
\\
Cookbook for retrieval-augmented generation using PDFs.\\
\\
cookbook](https://cookbook.openai.com/examples/file_search_responses)
### Fine-tuning models
In some cases, your application could benefit from a model that adapts to your specific task. You can use supervised or reinforcement fine-tuning to teach the models certain behaviors.
For example, supervised fine-tuning is a good fit when:
- You want the output to follow strict guidelines for tone, style, or format
- It’s easier to “show” than “tell” how to handle certain inputs to arrive at the desired outputs
- You want to process inputs or generate outputs in a consistent way
You can also use Direct Preference Optimization (DPO) to fine-tune a model with examples of what _not_ to do vs what is a preferred answer.
On the other hand, you can use reinforcement fine-tuning when you want reasoning models to accomplish nuanced objectives.
#### Learn and build
Explore the following resources to learn about core fine-tuning techniques for customizing model behavior. You can also dive deeper into fine-tuning with our [Model optimization](https://developers.openai.com/tracks/model-optimization) track.
[\\
\\
**Supervised fine-tuning overview** \\
\\
Guide to supervised fine-tuning for customizing model behavior.\\
\\
guide](https://platform.openai.com/docs/guides/supervised-fine-tuning) [\\
\\
**Reinforcement fine-tuning overview** \\
\\
Guide on reinforcement learning-based fine-tuning techniques.\\
\\
guide](https://platform.openai.com/docs/guides/reinforcement-fine-tuning) [\\
\\
**Fine-tuning cookbook** \\
\\
Cookbook on direct preference optimization for fine-tuning.\\
\\
cookbook](https://cookbook.openai.com/examples/fine_tuning_direct_preference_optimization_guide)
Now that we’ve covered how to build AI applications and incorporate some basic AI techniques in the development process, we’ll focus on testing and evaluation, learning how to integrate evals and guardrails to confidently ship AI applications that are safe, predictable, and production-ready.
## Phase 3: Testing and evaluation
Learn how to test, safeguard, and harden your AI applications before moving them into production. We’ll focus on:
- **Constructing robust evals** to measure correctness, quality, and reliability at scale
- **Adding guardrails** to block unsafe actions and enforce predictable behavior
- **Iterating with feedback loops** that surface weaknesses and strengthen your apps over time
By the end of this phase, you’ll be able to ship AI applications that are safe, reliable, and ready for users to trust.
### Constructing evals
To continuously measure and improve your applications from prototype through deployment, you need to design evaluation workflows.
Evals in practice let you:
- **Verify correctness**: Validate that outputs meet your desired logic and requirements.
- **Benchmark quality**: Compare performance over time with consistent rubrics.
- **Guide iteration**: Detect regressions, pinpoint weaknesses, and prioritize fixes as your app evolves.
By embedding evals into your development cycle, you create repeatable, objective feedback loops that keep your AI systems aligned with both user needs and business goals.
There are many types of evals, some that rely on a “ground truth” (a set of question/answer pairs), and others that rely on more subjective criteria.
Even when you have expected answers, comparing the model’s output to them might not always be straightforward. Sometimes, you can check in a simple way that the output matches the expected answer, like in the example below.
In other cases, you might need to rely on different metrics and scoring algorithms that can compare outputs holistically—when you’re comparing big chunks of text (e.g. translations, summaries) for example.
_Example: Check the model’s output against the expected answer, ignoring order._
```
// Reference answer
const correctAnswer = ["Eggs", "Sugar"];
// Model's answer
const modelAnswer = ["Sugar", "Eggs"];
// Simple check: Correct if same ingredients, order ignored
const isCorrect =
correctAnswer.sort().toString() === modelAnswer.sort().toString();
console.log(isCorrect ? "Correct!" : "Incorrect.");
```
#### Learn and build
Explore the following resources to learn evaluation-driven development to scale apps from prototype to production. These resources will walk you through how to design rubrics and measure outputs against business goals.
[\\
\\
**Evals design guide** \\
\\
Learn best practices for designing evals\\
\\
guide](https://platform.openai.com/docs/guides/evals-design) [\\
\\
**Eval-driven dev — prototype to launch** \\
\\
Cookbook demonstrating eval-driven development workflows.\\
\\
cookbook](https://cookbook.openai.com/examples/partners/eval_driven_system_design/receipt_inspection)
### Evals API
The OpenAI Platform provides an Evals API along with a dashboard that allows you to visually configure and run evals.
You can create evals, run them with different models and prompts, and analyze the results to decide next steps.
#### Learn and build
Learn more about the Evals API and how to use it with the resources below.
[\\
\\
**Evaluating model performance** \\
\\
Guide to measuring model quality using the Evals framework.\\
\\
guide](https://platform.openai.com/docs/guides/evals) [\\
\\
**Evals API — tools evaluation** \\
\\
Cookbook example demonstrating tool evaluation with the Evals API.\\
\\
cookbook](https://cookbook.openai.com/examples/evaluation/use-cases/tools-evaluation)
### Building guardrails
Guardrails act as protective boundaries that ensure your AI system behaves safely and predictably in the real world.
They help you:
- **Prevent unsafe behavior**: Block disallowed or non-compliant actions before they reach users.
- **Reduce hallucinations**: Catch and correct common failure modes in real time.
- **Maintain consistency**: Enforce rules and constraints across agents, tools, and workflows.
Together, evals and guardrails form the foundation of trustworthy, production-grade AI systems.
There are two types of guardrails:
- **Input guardrails**: To prevent unwanted inputs from being processed
- **Output guardrails**: To prevent unwanted outputs from being returned
In a production environment, ideally you would have both types of guardrails, depending on how the input and output are used and the level of risk you’re comfortable with.
It can be as easy as specifying something in the system prompt, or more complex, involving multiple checks.
One simple guardrail to implement is to use the Moderations API (which is free to use) to check if the input triggers any of the common flags (violence, illegal ask, etc.) and stop the generation process if it does.
_Example: Classify text for policy compliance with the Moderations API._
```
from openai import OpenAI
client = OpenAI()
response = client.moderations.create(
model="omni-moderation-latest",
input="I want to buy drugs",
)
print(response)
```
#### Learn and build
Explore the following resources to implement safeguards that make your AI predictable and compliant. Set up guardrails against common risks like hallucinations or unsafe tool use.
[\\
\\
**Building guardrails for agents** \\
\\
Guide to implementing safeguards and guardrails in agent applications.\\
\\
guide](https://openai.github.io/openai-agents-python/guardrails/) [\\
\\
**Developing hallucination guardrails** \\
\\
Cookbook for creating guardrails that reduce model hallucinations.\\
\\
cookbook](https://cookbook.openai.com/examples/developing_hallucination_guardrails)
Now that you’ve learned how to incorporate evals into your workflow and build guardrails to enforce safe and compliant behavior, you can move on to the last phase, where you’ll learn to optimize your applications for cost, latency, and production readiness.
## Phase 4: Scalability and maintenance
In this final phase, you’ll learn how to run AI applications at production scale—optimizing for accuracy, speed, and cost while ensuring long-term stability. We’ll focus on:
- **Optimizing models** to improve accuracy, consistency, and efficiency for real-world use
- **Cost and latency optimization** to balance performance, responsiveness, and budget
### Performance optimization
Optimizing your application’s performance means ensuring your workflows stay accurate, consistent, and efficient as they move into long-term production use.
There are 3 levers you can adjust:
- Improving the prompts (i.e. prompt engineering)
- Improving the context you provide to the model (i.e. RAG)
- Improving the model itself (i.e. fine-tuning)
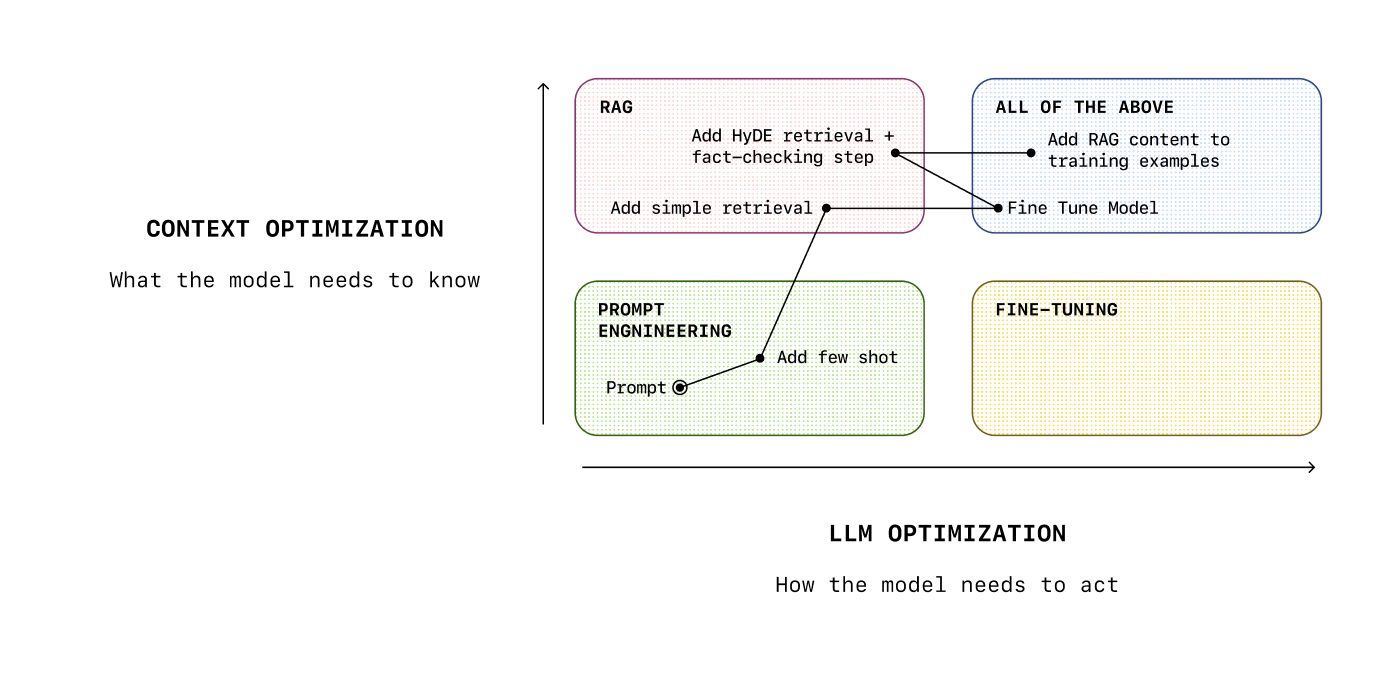
#### Deep-dive
This guide covers how you can combine these techniques to optimize your application’s performance.
[\\
\\
**LLM correctness and consistency** \\
\\
Best practices for achieving accurate and consistent model outputs.\\
\\
guide](https://platform.openai.com/docs/guides/optimizing-llm-accuracy)
### Cost & latency optimization
Every production AI system must balance performance with cost and latency. Often, these two go together, as smaller and faster models are also cheaper.
A few ways you can optimize these areas are:
- **Using smaller, fine-tuned models**: you can fine-tune a smaller model to your specific use case and maintain performance (a.k.a. distillation)
- **Prompt caching**: you can use prompt caching to improve latency and reduce costs for cached tokens (series of tokens that have already been seen by the model)
[\\
\\
**Prompt caching 101** \\
\\
Introductory cookbook on implementing prompt caching to reduce token usage.\\
\\
cookbook](https://cookbook.openai.com/examples/prompt_caching101) [\\
\\
**Model distillation overview** \\
\\
Overview of distillation techniques for creating efficient models.\\
\\
guide](https://platform.openai.com/docs/guides/distillation#page-top)
If latency isn’t a concern, consider these options to reduce costs with a latency trade-off:
- **Batch API**: you can use the Batch API to group requests together and get a 50% discount (however this is only valid for async use cases)
- **Flex processing**: you can use flex processing to get lower costs in exchange for slower responses times
[\\
\\
**Batch API guide** \\
\\
Guide on how to use the Batch API to reduce costs\\
\\
guide](https://platform.openai.com/docs/guides/batch) [\\
\\
**Flex processing guide** \\
\\
Guide on how to reduce costs with flex processing\\
\\
guide](https://platform.openai.com/docs/guides/flex-processing)
You can monitor your usage and costs with the cost API, to keep track on what you should optimize.
[\\
\\
**Keep costs low & accuracy high** \\
\\
Guide on balancing cost efficiency with model accuracy.\\
\\
guide](https://platform.openai.com/docs/guides/reasoning-best-practices#how-to-keep-costs-low-and-accuracy-high) [\\
\\
**Monitor usage with the Cost API** \\
\\
Cookbook showing how to track API usage and costs.\\
\\
cookbook](https://cookbook.openai.com/examples/completions_usage_api)
### Set up your account for production
On the OpenAI platform, we have the concept of tiers, going from 1 to 5. An organization in Tier 1 won’t be able to make the same number of requests per minute or send us the same amount of tokens per minute as an organization in Tier 5.
Before going live, make sure your tier is set up to manage the expected production usage—you can check our rate limits in the guide below.
Also make sure your billing limits are set up correctly, and your application is optimized and secure from an engineering standpoint.
Our production best practices guide will walk you through how to make sure your application is setup for scale.
[\\
\\
**Production best practices** \\
\\
Guide on best practices for running AI applications in production\\
\\
guide](https://platform.openai.com/docs/guides/production-best-practices) [\\
\\
**Rate limits guide** \\
\\
Guide to understanding and managing rate limits\\
\\
guide](https://platform.openai.com/docs/guides/rate-limits)
## Conclusion and next steps
In this track, you:
- Learned about core concepts such as agents and evals
- Designed and deployed applications using the Responses API or Agents SDK and optionally incorporated some basic techniques like prompt engineering, fine-tuning, and RAG
- Validated and safeguarded your solutions with evals and guardrails
- Optimized for cost, latency, and long-term reliability in production
This should give you the foundations to build your own AI applications and get them ready for production, taking ideas from concept to AI systems that can be deployed and scaled.
### Where to go next
Keep building your expertise with our advanced track on [Model optimization](https://developers.openai.com/tracks/model-optimization), or directly explore resources on topics you’re curious about.
### Feedback
[Share your feedback](https://docs.google.com/forms/d/e/1FAIpQLSdLbn7Tw1MxuwsSuoiNvyZt159rhNmDfg7swjYgKHzly4GlAQ/viewform?usp=sharing&ouid=108082195142646939431) on this track and suggest other topics you’d like us to cover.
```
--------------------------------------------------------------------------------
/docs/apps-sdk/_tracks_building-agents.txt:
--------------------------------------------------------------------------------
```
---
url: "https://developers.openai.com/tracks/building-agents"
title: "Building agents"
---
## Search the docs
⌘K/CtrlK
Close
Clear
Primary navigation
Resources
ResourcesCodexChatGPTBlog
Clear
- [Home](https://developers.openai.com/)
### Categories
- [Code](https://developers.openai.com/resources/code)
- [Cookbooks](https://developers.openai.com/resources/cookbooks)
- [Guides](https://developers.openai.com/resources/guides)
- [Videos](https://developers.openai.com/resources/videos)
### Topics
- [Agents](https://developers.openai.com/topics/agents)
- [Audio & Voice](https://developers.openai.com/topics/audio)
- [Image generation](https://developers.openai.com/topics/imagegen)
- [Tools](https://developers.openai.com/topics/tools)
- [Computer use](https://developers.openai.com/topics/cua)
- [Fine-tuning](https://developers.openai.com/topics/fine-tuning)
- [Scaling](https://developers.openai.com/topics/scaling)
## Introduction
You’ve probably heard of agents, but what does this term actually mean?
Our simple definition is:
> An AI system that has instructions (what it _should_ do), guardrails (what it _should not_ do), and access to tools (what it _can_ do) to take action on the user’s behalf
Think of it this way: if you’re building a chatbot-like experience, where the AI system is answering questions, you can’t really call it an agent.
If that system, however, is connected to other systems, and taking action based on the user’s input, that qualifies as an agent.
Simple agents may use a handful of tools, and complex agentic systems may orchestrate multiple agents to work together.
This learning track introduces you to the core concepts and practical steps required to build AI agents, as well as best practices to keep in mind when building these applications.
### What we will cover
1. **Core concepts**: how to choose the right models, and how to build the core logic
2. **Tools**: how to augment your agents with tools to enable them to retrieve data, execute tasks, and connect to external systems
3. **Orchestration**: how to build multi-step flows or networks of agents
4. **Example use cases**: practical implementations of different use cases
5. **Best practices**: how to implement guardrails, and next steps to consider
The goal of this track is to provide you with a comprehensive overview, and invite you to dive deeper with the resources linked in each section.
Some of these resources are code examples, allowing you to get started building quickly.
## Core concepts
The OpenAI platform provides composable primitives to build agents: **models**, **tools**, **state/memory**, and **orchestration**.
You can build powerful agentic experiences on our stack, with help in choosing the right models, augmenting your agents with tools, using different modalities (voice, vision, etc.), and evaluating and optimizing your application.
[\\
\\
**Building agents guide** \\
\\
Official guide to building agents using the OpenAI platform.\\
\\
guide](https://platform.openai.com/docs/guides/agents)
### Choosing the right model
Depending on your use case, you might need more or less powerful models.
OpenAI offers a wide range of models, from cheap and fast to very powerful models that can handle complex tasks.
#### Reasoning vs non‑reasoning models
In late 2024, with our first reasoning model `o1`, we introduced a new concept: the ability for models to think things through before giving a final answer.
That thinking is called a “chain of thought,” and it allows models to provide more accurate and reliable answers, especially when answering difficult questions.
With reasoning, models have the ability to form hypotheses, then test and refine them before validating the final answer. This process results in higher quality outputs.
Reasoning models trade latency and cost for reliability and often have adjustable levers (e.g., reasoning effort) that influence how hard the model “thinks.” Use a reasoning model when dealing with complex tasks, like planning, math, code generation, or multi‑tool workflows.
Non‑reasoning models are faster and usually cheaper, which makes them great for chatlike user experiences (with lots of back-and-forth) and simpler tasks where latency matters.
[\\
\\
**Reasoning guide** \\
\\
Overview of what reasoning is and how to prompt reasoning models\\
\\
guide](https://platform.openai.com/docs/guides/reasoning?api-mode=responses) [\\
\\
**Reasoning best practices** \\
\\
Prompting and optimization tips for reasoning models\\
\\
guide](https://platform.openai.com/docs/guides/reasoning-best-practices)
#### How to choose
Always start experimenting with a flagship, multi-purpose model—for example `gpt-4.1` or the new `gpt-5` with minimal `reasoning_effort`.
If your use case is simple and requires fast responses, try `gpt-5-mini` or even `gpt-5-nano`.
If your use case however is somewhat complex, you might want to try a reasoning model like `o4-mini` or `gpt-5` with medium `reasoning_effort`.
As you try different options, be mindful of prompting strategies: you don’t prompt a reasoning model the same way you prompt a GPT model.
So don’t just swap out the model name when you’re experimenting, try different prompts and see what works best—you can learn more in the evaluation section below.
If you need more horsepower, you can use more powerful models, like `o3` or `gpt-5` with high `reasoning_effort`. However, if your application presents a conversational interface, we recommend having a faster model to chat back and forth with the user, and then delegating to a more powerful model to perform specific tasks.
You can refer to our models page for more information on the different models available on the OpenAI platform, including information on performance, latency, capabilities, and pricing.
Reasoning models and general-purpose models respond best to different kinds of
prompts, and flagship models like `gpt-5` and `gpt-4.1` follow instructions
differently. Check out our prompting guide below for how to get the best out
of `gpt-5`.
[\\
\\
**OpenAI models page** \\
\\
Overview of the models available on the OpenAI platform.\\
\\
guide](https://platform.openai.com/docs/models) [\\
\\
**GPT-5 prompting guide** \\
\\
Cookbook guide on how to maximize GPT-5's performance.\\
\\
cookbook](https://cookbook.openai.com/examples/gpt-5/gpt-5_prompting_guide)
### Building the core logic
To get started building an agent, you have several options to choose from:
We have multiple core APIs you can use to talk to our models, but our flagship API that was specifically designed for building powerful agents is the **Responses API**.
When you’re building with the Responses API, you’re responsible for defining the core logic, and orchestrating the different parts of your application.
If you want a higher level of abstraction, you can also use the **Agents SDK**, our framework to build and orchestrate agents.
Which option you choose depends on personal preference: if you want to get started quickly or build networks of agents that work together, we recommend using the **Agents SDK**.
If you want to have more control over the different parts of your application, and really understand what’s going on under the hood, you can use the **Responses API**.
The Agents SDK is based on the Responses API, but you can also use it with other APIs and even external model providers if you choose. Think of it as another layer on top of the core APIs that makes it easier to build agentic applications.
It abstracts away the complexity, but the trade-off is that it might be harder to have fine-grained control over the core logic.
The Responses API is more flexible, but building with it requires more work to get started.
#### Building with the Responses API
The Responses API is our flagship core API to interact with our models.
It was designed to work well with our latest models’ capabilities, notably reasoning models, and comes with a set of built-in tools to augment your agents.
It’s a flexible foundation for building agentic applications.
It’s also stateful by default, meaning you don’t have to manage the conversation history on your side.
You can if your application requires it, but you can also rely on us to carry over the conversation history from one request to the next.
This makes it easier to build conversations that handle conversation threads without having to store the full conversation state client-side.
It’s especially helpful when you’re using tools that return large payloads as managing that context on your side can impact performance.
You can get started building with the Responses API by cloning our starter app and customizing it to your needs.
[\\
\\
**Responses guide** \\
\\
Introduction to the Responses API and its endpoints.\\
\\
guide](https://platform.openai.com/docs/api-reference/responses) [\\
\\
**Responses starter app** \\
\\
Starter application demonstrating OpenAI Responses API with tools.\\
\\
code](https://github.com/openai/openai-responses-starter-app)
#### Building with the Agents SDK
The Agents SDK is a lightweight framework that makes it easy to build single agents or orchestrate networks of agents.
It takes care of the complexity of handling agent loops, has built-in support for guardrails (making sure your agents don’t do anything unsafe or wrong), and introduces the concept of tracing that allows to monitor your workflows.
It works really well with our suite of optimization tools such as our evaluation tool, or our distillation and fine-tuning products.
If you want to learn more about how to optimize your applications, you can check out our [optimization track](https://developers.openai.com/tracks/model-optimization).
The Agents SDK repositories contain examples in JavaScript and Python to get started quickly, and you can learn more about it in the [Orchestration section](https://developers.openai.com/tracks/building-agents#orchestration) below.
[\\
\\
**Agents SDK quickstart** \\
\\
Step-by-step guide to quickly build agents with the OpenAI Agents SDK.\\
\\
guide](https://openai.github.io/openai-agents-python/quickstart/) [\\
\\
**Agents SDK — Python** \\
\\
Python SDK for developing agents with OpenAI.\\
\\
code](https://github.com/openai/openai-agents-python) [\\
\\
**Agents SDK — TypeScript** \\
\\
TypeScript SDK for developing agents with OpenAI.\\
\\
code](https://github.com/openai/openai-agents-js)
### Augmenting your agents with tools
Agents become useful when they can take action. And for them to be able to do that, you need to equip your agents with _tools_.
Tools are functions that your agent can call to perform specific tasks. They can be used to retrieve data, execute tasks, or even interact with external systems.
You can define any tools you want and tell the models how to use them using function calling, or you can rely on our offering of built-in tools - you can find out more about the tools available to you in the next section.
Rule of thumb: If the capability already exists as a built‑in tool, start
there. Move to function calling with your own functions when you need custom
logic.
## Tools
Explore how you can give your agents access to tools to enable actions like retrieving data, executing tasks, and connecting to external systems.
There are two types of tools:
- Custom tools that you define yourself, that the agent can call via function calling
- Built-in tools provided by OpenAI, that you can use out-of-the-box
### Function calling vs built‑in tools
Function calling happens in multiple steps:
- First, you define what functions you want the model to use and which parameters are expected
- Once the model is aware of the functions it can call, it can decide based on the conversation to call them with the corresponding parameters
- When that happens, you need to execute the execution of the function on your side
- You can then tell the model what the result of the function execution is by adding it to the conversation context
- The model can then use this result to generate the next response
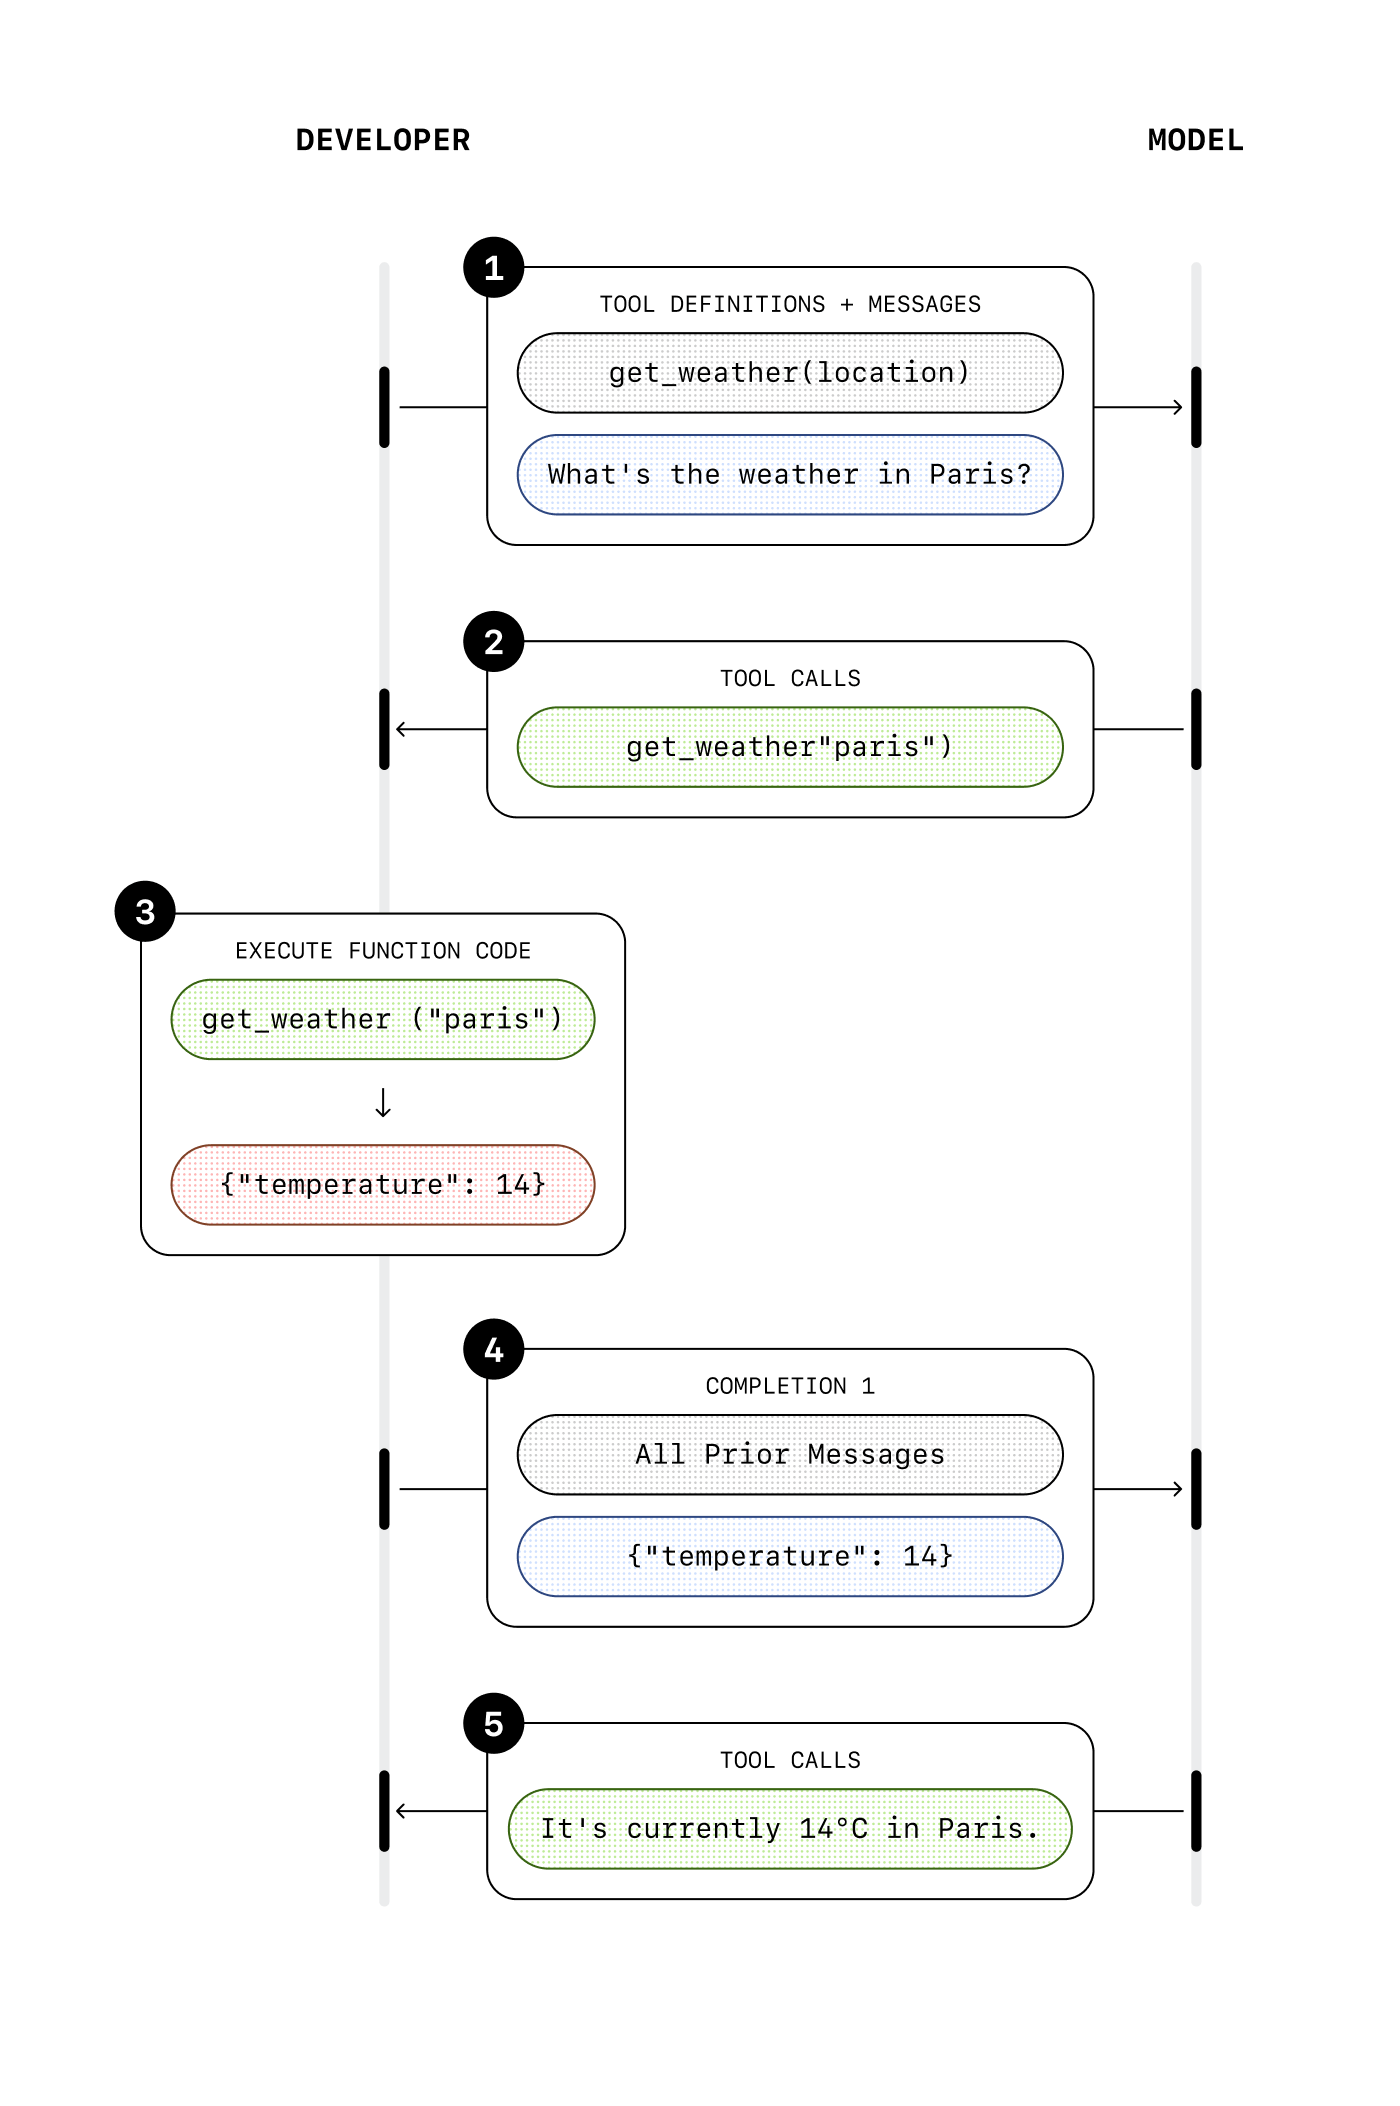
With built-in tools, you don’t need to handle the execution of the function on your side (except for the computer use tool, more on that below).
When the model decides to use a built-in tool, it’s automatically executed, and the result is added to the conversation context without you having to do anything.
In one conversation turn, you get output that already takes into account the tool result, since it’s executed on our infrastructure.
[\\
\\
**Function calling guide** \\
\\
Introduction to function calling with OpenAI models.\\
\\
guide](https://platform.openai.com/docs/guides/function-calling) [\\
\\
**Built-in tools guide** \\
\\
Guide to using OpenAI's built-in tools with the Responses API.\\
\\
guide](https://platform.openai.com/docs/guides/tools?api-mode=responses) [\\
\\
**Build hour — agentic tool calling** \\
\\
Build hour giving an overview of agentic tool calling.\\
\\
video](https://webinar.openai.com/on-demand/d1a99ac5-8de8-43c5-b209-21903d76b5b2)
### Built‑in tools
Built-in tools are an easy way to add capabilities to your agents, without having to build anything on your side.
You can give the model access to external or internal data, the ability to generate code or images, or even the ability to use computer interfaces, with very low effort.
There are a range of built-in tools you can choose from, each serving a specific purpose:
- **Web search**: Search the web for up-to-date information
- **File search**: Search across your internal knowledge base
- **Code interpreter**: Let the model run python code
- **Computer use**: Let the model use computer interfaces
- **Image generation**: Generate images with our latest image generation model
- **MCP**: Use any hosted [MCP](https://modelcontextprotocol.io/) server
Read more about each tool and how you can use them below or check out our build hour showing web search, file search, code interpreter and the MCP tool in action.
#### Web search
LLMs know a lot about the world, but they have a cutoff date in their training data, which means they don’t know about anything that happened after that date.
For example, `gpt-5` has a cutoff date of late September 2024. If you want your agents to know about recent events, you need to give them access to the web.
With the **web search** tool, you can do this in one line of code. Simply add web search as a tool your agent can use, and that’s it.
[\\
\\
**Web search guide** \\
\\
Guide to using web search with the Responses API.\\
\\
guide](https://platform.openai.com/docs/guides/tools-web-search)
#### File search
With **file search**, you can give your agent access to internal knowledge that it would not find on the web.
If you have a lot of proprietary data, feeding everything into the agent’s instructions might result in poor performance.
The more text you have in the input request, the slower (and more expensive) the request, and the agent could also get confused by all this information.
Instead, you want to retrieve just the information you need when you need it, and feed it to the agent so that it can generate relevant responses.
This process is called RAG (Retrieval-Augmented Generation), and it’s a very common technique used when building AI applications. However, there are many steps involved in building a robust RAG pipeline, and many parameters you need to think about:
1. First, you need to prepare the data to create your knowledge base. This means **pre-processing** the files that contain your knowledge, and often you’ll need to split them into smaller chunks.
If you have very large PDF files for example, you want to chunk them into smaller pieces so that each chunk covers a specific topic.
2. Then, you need to **embed** the chunks and store them in a vector database. This conversion into a numerical representation is how we can later on use algorithms to find the chunks most similar to a given text.
There are many vector databases to choose from, some are managed, some are self-hosted, but either way you would need to store the chunks somewhere.
3. Then, when you get an input request, you need to find the right chunks to give to the model to produce the best answer. This is the **retrieval** step.
Once again, it is not that straightforward: you might need to process the input to make the search more relevant, then you might need to “re-rank” the results you get from the vector database to make sure you pick the best.
4. Finally, once you have the most relevant chunks, you can include them in the context you send to the model to generate the final answer.
As you may have noticed, there is complexity involved with building a custom RAG pipeline, and it requires a lot of work to get right.
The **file search** tool allows you to bypass that complexity and get started quickly.
All you have to do is add your files to one of our managed vector stores, and we take care of the rest for you: we pre-process the files, embed them, and store them for later use.
Then, you can add the file search tool to your application, specify which vector store to use, and that’s it: the model will automatically decide when to use it and how to produce a final response.
[\\
\\
**File search guide** \\
\\
Guide to retrieving context from files using the Responses API.\\
\\
guide](https://platform.openai.com/docs/guides/tools-file-search)
#### Code interpreter
The **code interpreter** tool allows the model to come up with python code to solve a problem or answer a question, and execute it in a dedicated environment.
LLMs are great with words, but sometimes the best way to get to a result is through code, especially when there are numbers involved. That’s when **code interpreter** comes in:
it combines the power of LLMs for answer generation with the deterministic nature of code execution.
It accepts file inputs, so for example you could provide the model with a spreadsheet export that it can manipulate and analyze through code.
It can also generate files, for example charts or csv files that would be the output of the code execution.
This can be a powerful tool for agents that need to manipulate data or perform complex analysis.
[\\
\\
**Code interpreter guide** \\
\\
Guide to using the built-in code interpreter tool.\\
\\
guide](https://platform.openai.com/docs/guides/tools-code-interpreter)
#### Computer use
The **computer use** tool allows the model to perform actions on computer interfaces like a human would.
For example, it can navigate to a website, click on buttons or fill in forms.
This tool works a little differently: unlike with the other built-in tools, the tool result can’t be automatically appended to the conversation history, because we need to wait for the action to be executed to see what the next step should be.
So similarly to function calling, this tool call comes with parameters that define suggested actions: “click on this position”, “scroll by that amount”, etc.
It is then up to you to execute the action on your environment, either a virtual computer or a browser, and then send an update in the form of a screenshot.
The model can then assess what it should do next based on the visual interface, and may decide to perform another computer use call with the next action.
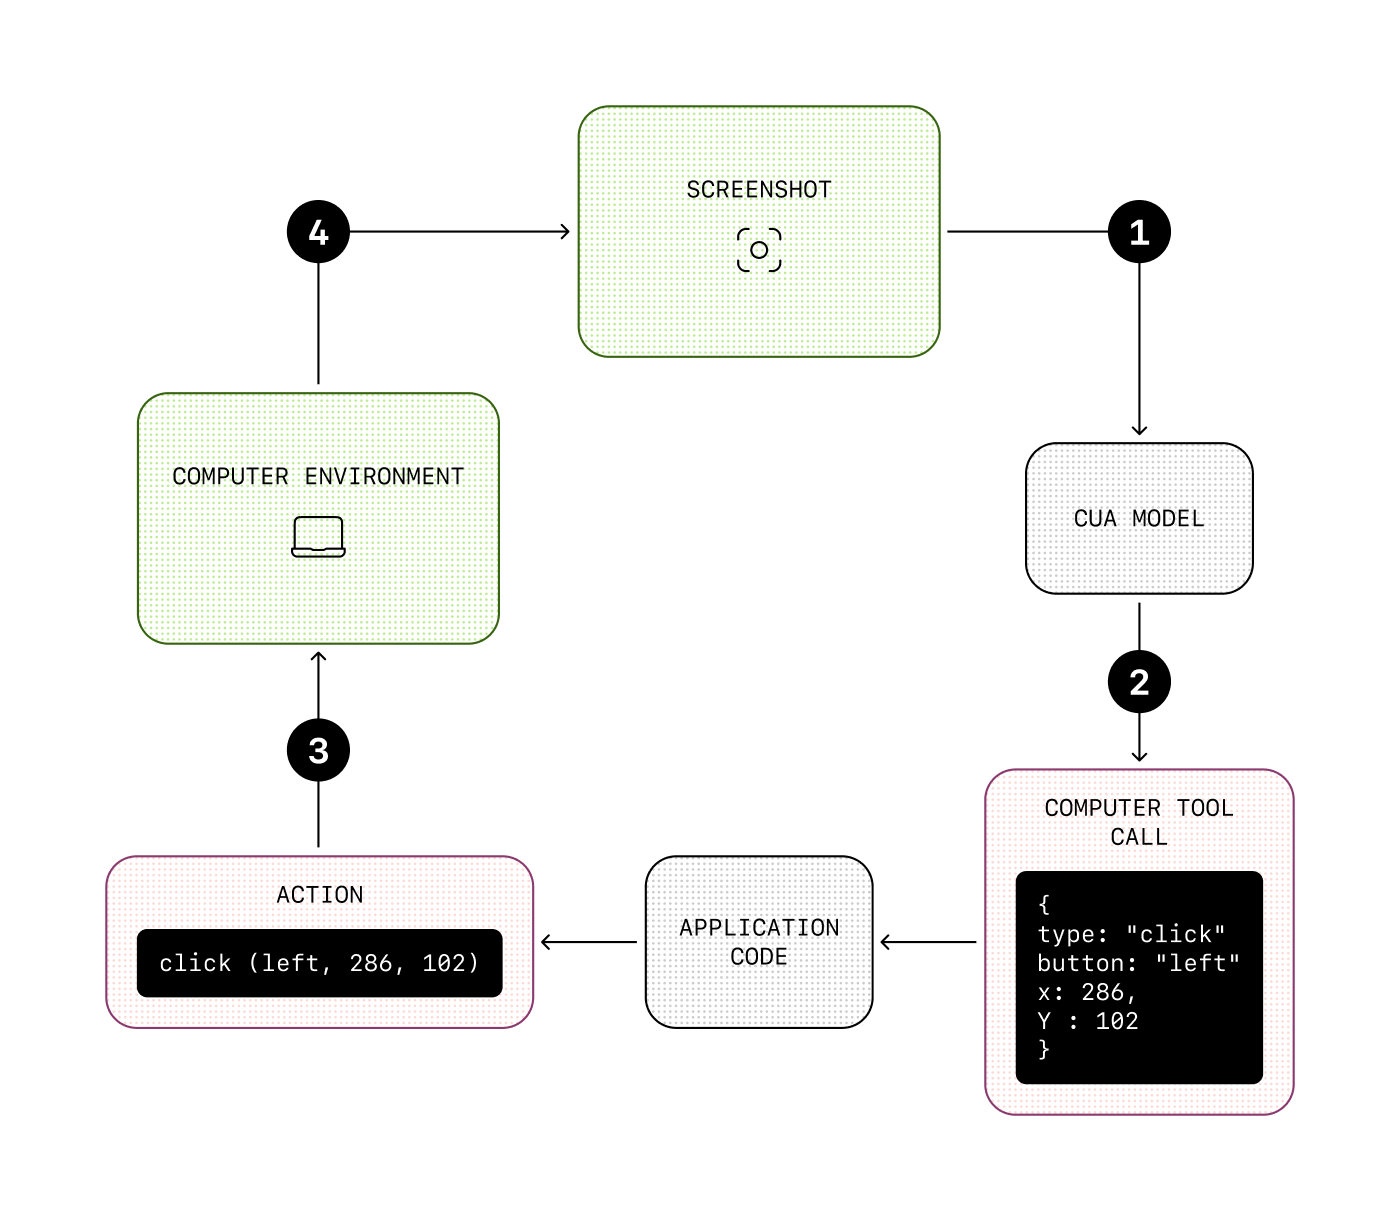
This can be useful if your agent needs to use services that don’t necessarily have an API available, or to automate processes that would normally be done by humans.
[\\
\\
**Computer Use API guide** \\
\\
Guide to using the Computer Use API (CUA).\\
\\
guide](https://platform.openai.com/docs/guides/tools-computer-use) [\\
\\
**Computer Use API — starter app** \\
\\
Sample app showcasing Computer Use API integration.\\
\\
code](https://github.com/openai/openai-cua-sample-app)
#### Image generation
The **image generation** tool allows the model to generate images based on a text prompt.
It is based on our latest image generation model, **GPT-Image**, which is a state-of-the-art model for image generation with world knowledge.
This is a powerful tool for agents that need to generate images within a conversation, for example to create a visual summary of the conversation, edit user-provided images, or generate and iterate on images with a lot of context.
[\\
\\
**Image generation guide** \\
\\
Guide to generating images using OpenAI models.\\
\\
guide](https://platform.openai.com/docs/guides/image-generation?image-generation-model=gpt-image-1) [\\
\\
**ImageGen cookbook** \\
\\
Cookbook examples for generating images with GPT-Image.\\
\\
cookbook](https://cookbook.openai.com/examples/generate_images_with_gpt_image) [\\
\\
**ImageGen with high fidelity cookbook** \\
\\
Cookbook examples for generating images with high fidelity using GPT-Image.\\
\\
cookbook](https://cookbook.openai.com/examples/generate_images_with_gpt_image)
## Orchestration
**Orchestration** is the concept of handling multiple steps, tool use, handoffs between different agents, guardrails, and context.
Put simply, it’s how you manage the conversation flow.
For example, in reaction to a user input, you might need to perform multiple steps to generate a final answer, each step feeding into the next.
You might also have a lot of complexity in your use case requiring a separation of concerns, and to do that you need to define multiple agents that work in concert.
If you’re building with the **Responses API**, you can manage this entirely on your side, maintaining state and context across steps, switching between models and instructions appropriately, etc.
However, for orchestration we recommend relying on the **Agents SDK**, which provides a set of primitives to help you easily define networks of agents, inject guardrails, define context, and more.
### Foundations of the Agents SDK
The Agents SDK uses a few core primitives:
| Primitive | What it is |
| --- | --- |
| Agent | model + instructions + tools |
| Handoff | other agent the current agent can hand off to |
| Guardrail | policy to filter out unwanted inputs |
| Session | automatically maintains conversation history across agent runs |
Each of these primitives is an abstraction allowing you to build faster, as the complexity that comes with handling these aspects is handled for you.
For example, the Agents SDK automatically handles:
- **Agent loop**: calling tools and executing function calls over multiple turns if needed
- **Handoffs**: switching instructions, models and available tools based on conversation state
- **Guardrails**: running inputs through filters to stop the generation if required
In addition to these features, the Agents SDK has built-in support for tracing, which allows you to monitor and debug your agents workflows.
Without any additional code, you can understand what happened: which tools were called, which agents were used, which guardrails were triggered, etc.
This allows you to iterate on your agents quickly and efficiently.
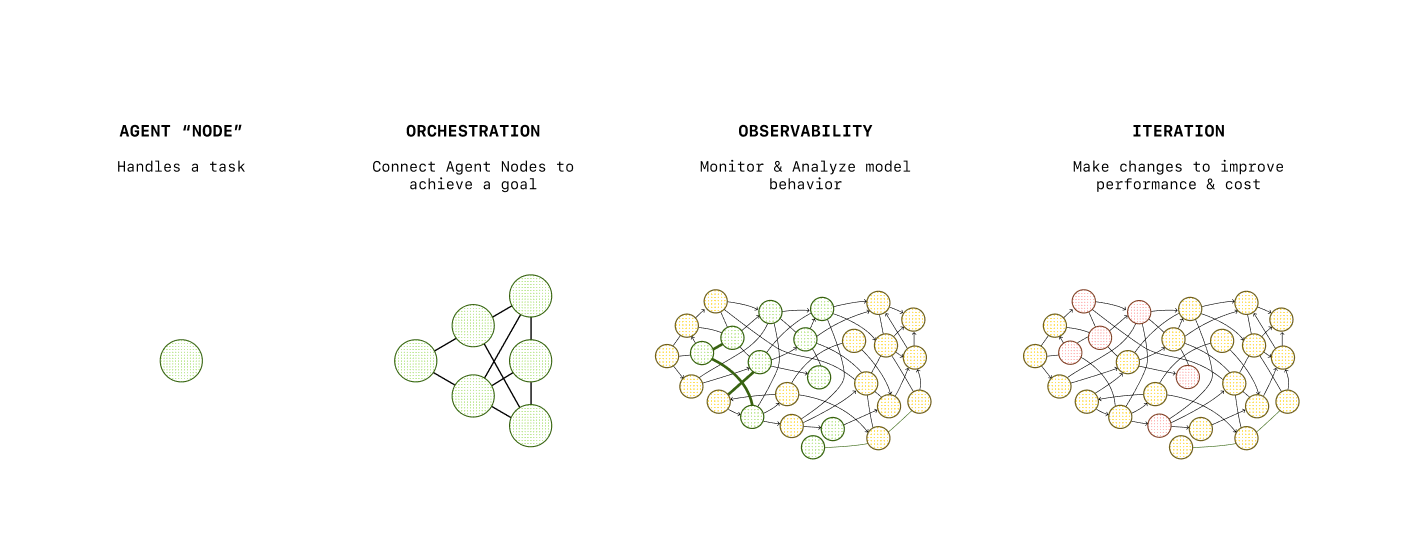
To try practical examples with the Agents SDK, check out our examples in the repositories below.
[\\
\\
**Agents SDK quickstart** \\
\\
Step-by-step guide to quickly build agents with the OpenAI Agents SDK.\\
\\
guide](https://openai.github.io/openai-agents-python/quickstart/) [\\
\\
**Agents SDK — Python** \\
\\
Python SDK for developing agents with OpenAI.\\
\\
code](https://github.com/openai/openai-agents-python) [\\
\\
**Agents SDK — TypeScript** \\
\\
TypeScript SDK for developing agents with OpenAI.\\
\\
code](https://github.com/openai/openai-agents-js)
### Multi-agent collaboration
In some cases, your application might benefit from having not just one, but multiple agents working together.
This shouldn’t be your go-to solution, but something you might consider if you have separate tasks that do not overlap and if for one or more of those tasks you have:
- Very complex or long instructions
- A lot of tools (or similar tools across tasks)
For example, if you have for each task several tools to retrieve, update or create data, but these actions work differently depending on the task, you don’t want to group all of these tools and give them to one agent.
The agent could get confused and use the tool meant for task A when the user needs the tool for task B.
Instead, you might want to have a separate agent for each task, and a “routing” agent that is the main interface for the user. Once the routing agent has determined which task to perform, it can hand off to the appropriate agent than can use the right tool for the task.
Similarly, if you have a task that has very complex instructions, or that needs to use a model with high reasoning power, you might want to have a separate agent for that task that is only called when needed, and use a faster, cheaper model for the main agent.
[\\
\\
**Orchestrating multiple agents** \\
\\
Guide to coordinating multiple agents with shared context.\\
\\
guide](https://openai.github.io/openai-agents-python/multi_agent/) [\\
\\
**Portfolio collab with Agents SDK** \\
\\
Cookbook example of agents collaborating to manage a portfolio.\\
\\
cookbook](https://cookbook.openai.com/examples/agents_sdk/multi-agent-portfolio-collaboration/multi_agent_portfolio_collaboration) [\\
\\
**Unlock agentic power — Agents SDK** \\
\\
Video demonstrating advanced capabilities of the Agents SDK.\\
\\
video](https://vimeo.com/1105245234)
### Multi‑agent collaboration
Why multiple agents instead of one mega‑prompt?
- **Separation of concerns**: Research vs. drafting vs. QA
- **Parallelism**: Faster end‑to‑end execution of tasks
- **Focused evals**: Score agents differently, depending on their scoped goals
Use **agent‑as‑tool** (expose one agent as a callable tool for another) and share memory keyed by `conversation_id`.
## Example use cases
There are many different use cases for agents, some that require a conversational interface, some where the agents are meant to be deeply integrated in an application.
For example, some agents use structured data as an input, others a simple query to trigger a series of actions before generating a final output.
Depending on the use case, you might want to optimize for different things—for example:
- **Speed**: if the user is interacting back and forth with the agent
- **Reliability**: if the agent is meant to tackle complex tasks and come out with a final, optimized output
- **Cost**: if the agent is meant to be used frequently and at scale
We have compiled a few example applications below you can use as starting points, each covering different interaction patterns:
- **Support agent**: a simple support agent built on top of the Responses API, with a “human in the loop” angle—the agent is meant to be used by a human that can accept or reject the agent’s suggestions
- **Customer service agent**: a network of multiple agents working together to handle a customer request, built with the Agents SDK
- **Frontend testing agent**: a computer using agent that requires a single user input to test a frontend application
[\\
\\
**Support agent demo** \\
\\
Demo showing a customer support agent with a human in the loop.\\
\\
code](https://github.com/openai/openai-support-agent-demo) [\\
\\
**CS agents demo** \\
\\
Demo showcasing customer service agents orchestration.\\
\\
code](https://github.com/openai/openai-cs-agents-demo) [\\
\\
**Frontend testing demo** \\
\\
Demo application for frontend testing using CUA.\\
\\
code](https://github.com/openai/openai-testing-agent-demo)
## Best practices
When you build agents, keep in mind that they might be unpredictable—that’s the nature of LLMs.
There are a few things you can do to make your agents more reliable, but it depends on what you are building and for whom.
### User inputs
If your agent accepts user inputs, you might want to include guardrails to make sure it can’t be jailbreaked or you don’t incur costs processing irrelevant inputs
Depending on the tools you use, the level of risk you are willing to take, and the scale of your application, you can implement more or less robust guardrails.
It can be as simple as something to include in your prompt (for example “don’t answer any question unrelated to X, Y or Z”) or as complex as a full-fledged multi-step guardrail system.
### Model outputs
A good practice is to use **structured outputs** whenever you want to use the model’s output as part of your application instead of simply displaying it to the user.
Structured outputs are a way to constrain the model to a strict json schema, so you always know what the output shape will be.
If your agent is user-facing, once again depending on the level of risk you’re comfortable with, you might want to implement output guardrails to make sure the output doesn’t break any rules (for example, if you’re a car company, you don’t want the model to tell customers they can buy your car for $1 and it’s contractually binding).
[\\
\\
**Structured outputs guide** \\
\\
Guide for producing structured outputs with the Responses API.\\
\\
guide](https://platform.openai.com/docs/guides/structured-outputs?api-mode=responses)
### Optimizing for production
If you plan to ship your agent to production, there are additional things to consider—you might want to optimize costs and latency, or monitor your agent to make sure it performs well.
To learn about these topics, you can check out our [AI application development track](https://developers.openai.com/tracks/ai-application-development).
## Conclusion and next steps
In this track you:
- Learned about the core concepts behind agents and how to build them
- Gained practical experience with the Responses API and the Agents SDK
- Discovered our built-in tools offering
- Learned about agent orchestration and multi-agent networks
- Explored example use cases
- Learned about best practices to manage user inputs and model outputs
These are the foundations to build your own agentic applications.
As a next step, you can learn how to deploy them in production with our [AI application development track](https://developers.openai.com/tracks/ai-application-development).
```
--------------------------------------------------------------------------------
/docs/apps-sdk/apps-sdk_build_examples.txt:
--------------------------------------------------------------------------------
```
---
url: "https://developers.openai.com/apps-sdk/build/examples"
title: "Examples"
---
## Search the docs
⌘K/CtrlK
Close
Clear
Primary navigation
ChatGPT
ResourcesCodexChatGPTBlog
Clear
- [Home](https://developers.openai.com/apps-sdk)
### Core Concepts
- [MCP Server](https://developers.openai.com/apps-sdk/concepts/mcp-server)
- [User interaction](https://developers.openai.com/apps-sdk/concepts/user-interaction)
- [Design guidelines](https://developers.openai.com/apps-sdk/concepts/design-guidelines)
### Plan
- [Research use cases](https://developers.openai.com/apps-sdk/plan/use-case)
- [Define tools](https://developers.openai.com/apps-sdk/plan/tools)
- [Design components](https://developers.openai.com/apps-sdk/plan/components)
### Build
- [Set up your server](https://developers.openai.com/apps-sdk/build/mcp-server)
- [Build a custom UX](https://developers.openai.com/apps-sdk/build/custom-ux)
- [Authenticate users](https://developers.openai.com/apps-sdk/build/auth)
- [Persist state](https://developers.openai.com/apps-sdk/build/storage)
- [Examples](https://developers.openai.com/apps-sdk/build/examples)
### Deploy
- [Deploy your app](https://developers.openai.com/apps-sdk/deploy)
- [Connect from ChatGPT](https://developers.openai.com/apps-sdk/deploy/connect-chatgpt)
- [Test your integration](https://developers.openai.com/apps-sdk/deploy/testing)
### Guides
- [Optimize Metadata](https://developers.openai.com/apps-sdk/guides/optimize-metadata)
- [Security & Privacy](https://developers.openai.com/apps-sdk/guides/security-privacy)
- [Troubleshooting](https://developers.openai.com/apps-sdk/deploy/troubleshooting)
### Resources
- [Reference](https://developers.openai.com/apps-sdk/reference)
- [App developer guidelines](https://developers.openai.com/apps-sdk/app-developer-guidelines)
## Overview
The Pizzaz demo app bundles a handful of UI components so you can see the full tool surface area end-to-end. The following sections walk through the MCP server and the component implementations that power those tools.
You can find the “Pizzaz” demo app and other examples in our [examples repository on GitHub](https://github.com/openai/openai-apps-sdk-examples).
Use these examples as blueprints when you assemble your own app.
## MCP Source
This TypeScript server shows how to register multiple tools that share data with pre-built UI resources. Each resource call returns a Skybridge HTML shell, and every tool responds with matching metadata so ChatGPT knows which component to render.
```
import { McpServer } from "@modelcontextprotocol/sdk/server/mcp.js";
import { z } from "zod";
declare const server: McpServer;
// UI resource (no inline data assignment; host will inject data)
server.registerResource(
"pizza-map",
"ui://widget/pizza-map.html",
{},
async () => ({
contents: [\
{\
uri: "ui://widget/pizza-map.html",\
mimeType: "text/html+skybridge",\
text: `\
<div id="pizzaz-root"></div>\
<link rel="stylesheet" href="https://persistent.oaistatic.com/ecosystem-built-assets/pizzaz-0038.css">\
<script type="module" src="https://persistent.oaistatic.com/ecosystem-built-assets/pizzaz-0038.js"></script>\
`.trim(),\
},\
],
})
);
server.registerTool(
"pizza-map",
{
title: "Show Pizza Map",
_meta: {
"openai/outputTemplate": "ui://widget/pizza-map.html",
"openai/toolInvocation/invoking": "Hand-tossing a map",
"openai/toolInvocation/invoked": "Served a fresh map",
},
inputSchema: { pizzaTopping: z.string() },
},
async () => {
return {
content: [{ type: "text", text: "Rendered a pizza map!" }],
structuredContent: {},
};
}
);
server.registerResource(
"pizza-carousel",
"ui://widget/pizza-carousel.html",
{},
async () => ({
contents: [\
{\
uri: "ui://widget/pizzaz-carousel.html",\
mimeType: "text/html+skybridge",\
text: `\
<div id="pizzaz-carousel-root"></div>\
<link rel="stylesheet" href="https://persistent.oaistatic.com/ecosystem-built-assets/pizzaz-carousel-0038.css">\
<script type="module" src="https://persistent.oaistatic.com/ecosystem-built-assets/pizzaz-carousel-0038.js"></script>\
`.trim(),\
},\
],
})
);
server.registerTool(
"pizza-carousel",
{
title: "Show Pizza Carousel",
_meta: {
"openai/outputTemplate": "ui://widget/pizza-carousel.html",
"openai/toolInvocation/invoking": "Carousel some spots",
"openai/toolInvocation/invoked": "Served a fresh carousel",
},
inputSchema: { pizzaTopping: z.string() },
},
async () => {
return {
content: [{ type: "text", text: "Rendered a pizza carousel!" }],
structuredContent: {},
};
}
);
server.registerResource(
"pizza-albums",
"ui://widget/pizza-albums.html",
{},
async () => ({
contents: [\
{\
uri: "ui://widget/pizzaz-albums.html",\
mimeType: "text/html+skybridge",\
text: `\
<div id="pizzaz-albums-root"></div>\
<link rel="stylesheet" href="https://persistent.oaistatic.com/ecosystem-built-assets/pizzaz-albums-0038.css">\
<script type="module" src="https://persistent.oaistatic.com/ecosystem-built-assets/pizzaz-albums-0038.js"></script>\
`.trim(),\
},\
],
})
);
server.registerTool(
"pizza-albums",
{
title: "Show Pizza Album",
_meta: {
"openai/outputTemplate": "ui://widget/pizza-albums.html",
"openai/toolInvocation/invoking": "Hand-tossing an album",
"openai/toolInvocation/invoked": "Served a fresh album",
},
inputSchema: { pizzaTopping: z.string() },
},
async () => {
return {
content: [{ type: "text", text: "Rendered a pizza album!" }],
structuredContent: {},
};
}
);
server.registerResource(
"pizza-list",
"ui://widget/pizza-list.html",
{},
async () => ({
contents: [\
{\
uri: "ui://widget/pizzaz-list.html",\
mimeType: "text/html+skybridge",\
text: `\
<div id="pizzaz-list-root"></div>\
<link rel="stylesheet" href="https://persistent.oaistatic.com/ecosystem-built-assets/pizzaz-list-0038.css">\
<script type="module" src="https://persistent.oaistatic.com/ecosystem-built-assets/pizzaz-list-0038.js"></script>\
`.trim(),\
},\
],
})
);
server.registerTool(
"pizza-list",
{
title: "Show Pizza List",
_meta: {
"openai/outputTemplate": "ui://widget/pizza-list.html",
"openai/toolInvocation/invoking": "Hand-tossing a list",
"openai/toolInvocation/invoked": "Served a fresh list",
},
inputSchema: { pizzaTopping: z.string() },
},
async () => {
return {
content: [{ type: "text", text: "Rendered a pizza list!" }],
structuredContent: {},
};
}
);
server.registerResource(
"pizza-video",
"ui://widget/pizza-video.html",
{},
async () => ({
contents: [\
{\
uri: "ui://widget/pizzaz-video.html",\
mimeType: "text/html+skybridge",\
text: `\
<div id="pizzaz-video-root"></div>\
<link rel="stylesheet" href="https://persistent.oaistatic.com/ecosystem-built-assets/pizzaz-video-0038.css">\
<script type="module" src="https://persistent.oaistatic.com/ecosystem-built-assets/pizzaz-video-0038.js"></script>\
`.trim(),\
},\
],
})
);
server.registerTool(
"pizza-video",
{
title: "Show Pizza Video",
_meta: {
"openai/outputTemplate": "ui://widget/pizza-video.html",
"openai/toolInvocation/invoking": "Hand-tossing a video",
"openai/toolInvocation/invoked": "Served a fresh video",
},
inputSchema: { pizzaTopping: z.string() },
},
async () => {
return {
content: [{ type: "text", text: "Rendered a pizza video!" }],
structuredContent: {},
};
}
);
```
## Pizzaz Map Source

The map component is a React + Mapbox client that syncs its state back to ChatGPT. It renders marker interactions, inspector routing, and fullscreen handling so you can study a heavier, stateful component example.
```
import React, { useEffect, useRef, useState } from "react";
import mapboxgl from "mapbox-gl";
import "mapbox-gl/dist/mapbox-gl.css";
import { createRoot } from "react-dom/client";
import markers from "./markers.json";
import { AnimatePresence } from "framer-motion";
import Inspector from "./Inspector";
import Sidebar from "./Sidebar";
import { useOpenaiGlobal } from "../use-openai-global";
import { useMaxHeight } from "../use-max-height";
import { Maximize2 } from "lucide-react";
import {
useNavigate,
useLocation,
Routes,
Route,
BrowserRouter,
Outlet,
} from "react-router-dom";
mapboxgl.accessToken =
"pk.eyJ1IjoiZXJpY25pbmciLCJhIjoiY21icXlubWM1MDRiczJvb2xwM2p0amNyayJ9.n-3O6JI5nOp_Lw96ZO5vJQ";
function fitMapToMarkers(map, coords) {
if (!map || !coords.length) return;
if (coords.length === 1) {
map.flyTo({ center: coords[0], zoom: 12 });
return;
}
const bounds = coords.reduce(
(b, c) => b.extend(c),
new mapboxgl.LngLatBounds(coords[0], coords[0])
);
map.fitBounds(bounds, { padding: 60, animate: true });
}
export default function App() {
const mapRef = useRef(null);
const mapObj = useRef(null);
const markerObjs = useRef([]);
const places = markers?.places || [];
const markerCoords = places.map((p) => p.coords);
const navigate = useNavigate();
const location = useLocation();
const selectedId = React.useMemo(() => {
const match = location?.pathname?.match(/(?:^|\/)place\/([^/]+)/);
return match && match[1] ? match[1] : null;
}, [location?.pathname]);
const selectedPlace = places.find((p) => p.id === selectedId) || null;
const [viewState, setViewState] = useState(() => ({
center: markerCoords.length > 0 ? markerCoords[0] : [0, 0],
zoom: markerCoords.length > 0 ? 12 : 2,
}));
const displayMode = useOpenaiGlobal("displayMode");
const allowInspector = displayMode === "fullscreen";
const maxHeight = useMaxHeight() ?? undefined;
useEffect(() => {
if (mapObj.current) return;
mapObj.current = new mapboxgl.Map({
container: mapRef.current,
style: "mapbox://styles/mapbox/streets-v12",
center: markerCoords.length > 0 ? markerCoords[0] : [0, 0],
zoom: markerCoords.length > 0 ? 12 : 2,
attributionControl: false,
});
addAllMarkers(places);
setTimeout(() => {
fitMapToMarkers(mapObj.current, markerCoords);
}, 0);
// after first paint
requestAnimationFrame(() => mapObj.current.resize());
// or keep it in sync with window resizes
window.addEventListener("resize", mapObj.current.resize);
return () => {
window.removeEventListener("resize", mapObj.current.resize);
mapObj.current.remove();
};
// eslint-disable-next-line
}, []);
useEffect(() => {
if (!mapObj.current) return;
const handler = () => {
const c = mapObj.current.getCenter();
setViewState({ center: [c.lng, c.lat], zoom: mapObj.current.getZoom() });
};
mapObj.current.on("moveend", handler);
return () => {
mapObj.current.off("moveend", handler);
};
}, []);
function addAllMarkers(placesList) {
markerObjs.current.forEach((m) => m.remove());
markerObjs.current = [];
placesList.forEach((place) => {
const marker = new mapboxgl.Marker({
color: "#F46C21",
})
.setLngLat(place.coords)
.addTo(mapObj.current);
const el = marker.getElement();
if (el) {
el.style.cursor = "pointer";
el.addEventListener("click", () => {
navigate(`place/${place.id}`);
panTo(place.coords, { offsetForInspector: true });
});
}
markerObjs.current.push(marker);
});
}
function getInspectorHalfWidthPx() {
if (displayMode !== "fullscreen") return 0;
if (typeof window === "undefined") return 0;
const isLgUp =
window.matchMedia && window.matchMedia("(min-width: 1024px)").matches;
if (!isLgUp) return 0;
const el = document.querySelector(".pizzaz-inspector");
const w = el ? el.getBoundingClientRect().width : 360;
return Math.round(w / 2);
}
function panTo(
coord,
{ offsetForInspector } = { offsetForInspector: false }
) {
if (!mapObj.current) return;
const halfInspector = offsetForInspector ? getInspectorHalfWidthPx() : 0;
const flyOpts = {
center: coord,
zoom: 14,
speed: 1.2,
curve: 1.6,
};
if (halfInspector) {
flyOpts.offset = [-halfInspector, 0];
}
mapObj.current.flyTo(flyOpts);
}
useEffect(() => {
if (!mapObj.current) return;
addAllMarkers(places);
}, [places]);
// Pan the map when the selected place changes via routing
useEffect(() => {
if (!mapObj.current || !selectedPlace) return;
panTo(selectedPlace.coords, { offsetForInspector: true });
}, [selectedId]);
// Ensure Mapbox resizes when container maxHeight/display mode changes
useEffect(() => {
if (!mapObj.current) return;
mapObj.current.resize();
}, [maxHeight, displayMode]);
useEffect(() => {
if (
typeof window !== "undefined" &&
window.oai &&
typeof window.oai.widget.setState === "function"
) {
window.oai.widget.setState({
center: viewState.center,
zoom: viewState.zoom,
markers: markerCoords,
});
}
}, [viewState, markerCoords]);
return (
<div
style={{
maxHeight,
height: displayMode === "fullscreen" ? maxHeight : 480,
}}
className={
"relative antialiased w-full min-h-[480px] overflow-hidden " +
(displayMode === "fullscreen"
? "rounded-none border-0"
: "border border-black/10 dark:border-white/10 rounded-2xl sm:rounded-3xl")
}
>
<Outlet />
{displayMode !== "fullscreen" && (
<button
aria-label="Enter fullscreen"
className="absolute top-4 right-4 z-30 rounded-full bg-white text-black shadow-lg ring ring-black/5 p-2.5 pointer-events-auto"
onClick={() => {
if (selectedId) {
navigate("..", { replace: true });
}
if (window?.openai?.requestDisplayMode) {
window.openai.requestDisplayMode({ mode: "fullscreen" });
}
}}
>
<Maximize2
strokeWidth={1.5}
className="h-4.5 w-4.5"
aria-hidden="true"
/>
</button>
)}
{/* Sidebar */}
<Sidebar
places={places}
selectedId={selectedId}
onSelect={(place) => {
navigate(`place/${place.id}`);
panTo(place.coords, { offsetForInspector: true });
}}
/>
{/* Inspector (right) */}
<AnimatePresence>
{allowInspector && selectedPlace && (
<Inspector
key={selectedPlace.id}
place={selectedPlace}
onClose={() => navigate("..")}
/>
)}
</AnimatePresence>
{/* Map */}
<div
className={
"absolute inset-0 overflow-hidden" +
(displayMode === "fullscreen"
? " md:left-[340px] md:right-4 md:top-4 md:bottom-4 border border-black/10 md:rounded-3xl"
: "")
}
>
<div
ref={mapRef}
className="w-full h-full relative absolute bottom-0 left-0 right-0"
style={{
maxHeight,
height: displayMode === "fullscreen" ? maxHeight : undefined,
}}
/>
</div>
</div>
);
}
function RouterRoot() {
return (
<Routes>
<Route path="*" element={<App />}>
<Route path="place/:placeId" element={<></>} />
</Route>
</Routes>
);
}
createRoot(document.getElementById("pizzaz-root")).render(
<BrowserRouter>
<RouterRoot />
</BrowserRouter>
);
```
## Pizzaz Carousel Source

This carousel demonstrates how to build a lightweight gallery view. It leans on embla-carousel for touch-friendly scrolling and wires up button state so the component stays reactive without any server roundtrips.
```
import useEmblaCarousel from "embla-carousel-react";
import { ArrowLeft, ArrowRight } from "lucide-react";
import React from "react";
import { Star } from "lucide-react";
import { createRoot } from "react-dom/client";
import markers from "../pizzaz/markers.json";
import PlaceCard from "./PlaceCard";
function App() {
const places = markers?.places || [];
const [emblaRef, emblaApi] = useEmblaCarousel({
align: "center",
loop: false,
containScroll: "trimSnaps",
slidesToScroll: "auto",
dragFree: false,
});
const [canPrev, setCanPrev] = React.useState(false);
const [canNext, setCanNext] = React.useState(false);
React.useEffect(() => {
if (!emblaApi) return;
const updateButtons = () => {
setCanPrev(emblaApi.canScrollPrev());
setCanNext(emblaApi.canScrollNext());
};
updateButtons();
emblaApi.on("select", updateButtons);
emblaApi.on("reInit", updateButtons);
return () => {
emblaApi.off("select", updateButtons);
emblaApi.off("reInit", updateButtons);
};
}, [emblaApi]);
return (
<div className="antialiased relative w-full text-black py-5">
<div className="overflow-hidden" ref={emblaRef}>
<div className="flex gap-4 items-stretch">
{places.map((place) => (
<PlaceCard key={place.id} place={place} />
))}
</div>
</div>
{/* Edge gradients */}
<div
aria-hidden
className={
"pointer-events-none absolute inset-y-0 left-0 w-3 z-[5] transition-opacity duration-200 " +
(canPrev ? "opacity-100" : "opacity-0")
}
>
<div
className="h-full w-full border-l border-black/15 bg-gradient-to-r from-black/10 to-transparent"
style={{
WebkitMaskImage:
"linear-gradient(to bottom, transparent 0%, white 30%, white 70%, transparent 100%)",
maskImage:
"linear-gradient(to bottom, transparent 0%, white 30%, white 70%, transparent 100%)",
}}
/>
</div>
<div
aria-hidden
className={
"pointer-events-none absolute inset-y-0 right-0 w-3 z-[5] transition-opacity duration-200 " +
(canNext ? "opacity-100" : "opacity-0")
}
>
<div
className="h-full w-full border-r border-black/15 bg-gradient-to-l from-black/10 to-transparent"
style={{
WebkitMaskImage:
"linear-gradient(to bottom, transparent 0%, white 30%, white 70%, transparent 100%)",
maskImage:
"linear-gradient(to bottom, transparent 0%, white 30%, white 70%, transparent 100%)",
}}
/>
</div>
{canPrev && (
<button
aria-label="Previous"
className="absolute left-2 top-1/2 -translate-y-1/2 z-10 inline-flex items-center justify-center h-8 w-8 rounded-full bg-white text-black shadow-lg ring ring-black/5 hover:bg-white"
onClick={() => emblaApi && emblaApi.scrollPrev()}
type="button"
>
<ArrowLeft
strokeWidth={1.5}
className="h-4.5 w-4.5"
aria-hidden="true"
/>
</button>
)}
{canNext && (
<button
aria-label="Next"
className="absolute right-2 top-1/2 -translate-y-1/2 z-10 inline-flex items-center justify-center h-8 w-8 rounded-full bg-white text-black shadow-lg ring ring-black/5 hover:bg-white"
onClick={() => emblaApi && emblaApi.scrollNext()}
type="button"
>
<ArrowRight
strokeWidth={1.5}
className="h-4.5 w-4.5"
aria-hidden="true"
/>
</button>
)}
</div>
);
}
createRoot(document.getElementById("pizzaz-carousel-root")).render(<App />);
export default function PlaceCard({ place }) {
if (!place) return null;
return (
<div className="min-w-[220px] select-none max-w-[220px] w-[65vw] sm:w-[220px] self-stretch flex flex-col">
<div className="w-full">
<img
src={place.thumbnail}
alt={place.name}
className="w-full aspect-square rounded-2xl object-cover ring ring-black/5 shadow-[0px_2px_6px_rgba(0,0,0,0.06)]"
/>
</div>
<div className="mt-3 flex flex-col flex-1 flex-auto">
<div className="text-base font-medium truncate line-clamp-1">
{place.name}
</div>
<div className="text-xs mt-1 text-black/60 flex items-center gap-1">
<Star className="h-3 w-3" aria-hidden="true" />
{place.rating?.toFixed ? place.rating.toFixed(1) : place.rating}
{place.price ? <span>· {place.price}</span> : null}
<span>· San Francisco</span>
</div>
{place.description ? (
<div className="text-sm mt-2 text-black/80 flex-auto">
{place.description}
</div>
) : null}
<div className="mt-5">
<button
type="button"
className="cursor-pointer inline-flex items-center rounded-full bg-[#F46C21] text-white px-4 py-1.5 text-sm font-medium hover:opacity-90 active:opacity-100"
>
Order now
</button>
</div>
</div>
</div>
);
}
```
## Pizzaz List Source

This list layout mirrors what you might embed in a chat-initiated itinerary or report. It balances a hero summary with a scrollable ranking so you can experiment with denser information hierarchies inside a component.
```
import React from "react";
import { createRoot } from "react-dom/client";
import markers from "../pizzaz/markers.json";
import { PlusCircle, Star } from "lucide-react";
function App() {
const places = markers?.places || [];
return (
<div className="antialiased w-full text-black px-4 pb-2 border border-black/10 dark:border-white/10 rounded-2xl sm:rounded-3xl overflow-hidden">
<div className="max-w-full">
<div className="flex flex-row items-center gap-4 sm:gap-4 border-b border-black/5 py-4">
<div
className="sm:w-18 w-16 aspect-square rounded-xl bg-cover bg-center"
style={{
backgroundImage:
"url(https://plus.unsplash.com/premium_photo-1675884306775-a0db978623a0?w=900&auto=format&fit=crop&q=60&ixlib=rb-4.1.0&ixid=M3wxMjA3fDB8MHxzZWFyY2h8NDV8fHBpenphJTIwd2FsbHBhcGVyfGVufDB8fDB8fHww)",
}}
></div>
<div>
<div className="text-base sm:text-xl font-medium">
National Best Pizza List
</div>
<div className="text-sm text-black/60">
A ranking of the best pizzerias in the world
</div>
</div>
<div className="flex-auto hidden sm:flex justify-end pr-2">
<button
type="button"
className="cursor-pointer inline-flex items-center rounded-full bg-[#F46C21] text-white px-4 py-1.5 sm:text-md text-sm font-medium hover:opacity-90 active:opacity-100"
>
Save List
</button>
</div>
</div>
<div className="min-w-full text-sm flex flex-col">
{places.slice(0, 7).map((place, i) => (
<div
key={place.id}
className="px-3 -mx-2 rounded-2xl hover:bg-black/5"
>
<div
style={{
borderBottom:
i === 7 - 1 ? "none" : "1px solid rgba(0, 0, 0, 0.05)",
}}
className="flex w-full items-center hover:border-black/0! gap-2"
>
<div className="py-3 pr-3 min-w-0 w-full sm:w-3/5">
<div className="flex items-center gap-3">
<img
src={place.thumbnail}
alt={place.name}
className="h-10 w-10 sm:h-11 sm:w-11 rounded-lg object-cover ring ring-black/5"
/>
<div className="w-3 text-end sm:block hidden text-sm text-black/40">
{i + 1}
</div>
<div className="min-w-0 sm:pl-1 flex flex-col items-start h-full">
<div className="font-medium text-sm sm:text-md truncate max-w-[40ch]">
{place.name}
</div>
<div className="mt-1 sm:mt-0.25 flex items-center gap-3 text-black/70 text-sm">
<div className="flex items-center gap-1">
<Star
strokeWidth={1.5}
className="h-3 w-3 text-black"
/>
<span>
{place.rating?.toFixed
? place.rating.toFixed(1)
: place.rating}
</span>
</div>
<div className="whitespace-nowrap sm:hidden">
{place.city || "–"}
</div>
</div>
</div>
</div>
</div>
<div className="hidden sm:block text-end py-2 px-3 text-sm text-black/60 whitespace-nowrap flex-auto">
{place.city || "–"}
</div>
<div className="py-2 whitespace-nowrap flex justify-end">
<PlusCircle strokeWidth={1.5} className="h-5 w-5" />
</div>
</div>
</div>
))}
{places.length === 0 && (
<div className="py-6 text-center text-black/60">
No pizzerias found.
</div>
)}
</div>
<div className="sm:hidden px-0 pt-2 pb-2">
<button
type="button"
className="w-full cursor-pointer inline-flex items-center justify-center rounded-full bg-[#F46C21] text-white px-4 py-2 font-medium hover:opacity-90 active:opacity-100"
>
Save List
</button>
</div>
</div>
</div>
);
}
createRoot(document.getElementById("pizzaz-list-root")).render(<App />);
```
## Pizzaz Video Source
The video component wraps a scripted player that tracks playback, overlays controls, and reacts to fullscreen changes. Use it as a reference for media-heavy experiences that still need to integrate with the ChatGPT container APIs.
```
import { Maximize2, Play } from "lucide-react";
import React from "react";
import { createRoot } from "react-dom/client";
import { useMaxHeight } from "../use-max-height";
import { useOpenaiGlobal } from "../use-openai-global";
import script from "./script.json";
function App() {
return (
<div className="antialiased w-full text-black">
<VideoPlayer />
</div>
);
}
createRoot(document.getElementById("pizzaz-video-root")).render(<App />);
export default function VideoPlayer() {
const videoRef = React.useRef(null);
const [showControls, setShowControls] = React.useState(false);
const [showOverlayPlay, setShowOverlayPlay] = React.useState(true);
const [isPlaying, setIsPlaying] = React.useState(false);
const lastBucketRef = React.useRef(null);
const isPlayingRef = React.useRef(false);
const [activeTab, setActiveTab] = React.useState("summary");
const [currentTime, setCurrentTime] = React.useState(0);
const VIDEO_DESCRIPTION =
"President Obama delivered his final weekly address thanking the American people for making him a better President and a better man.";
const displayMode = useOpenaiGlobal("displayMode");
const isFullscreen = displayMode === "fullscreen";
const maxHeight = useMaxHeight() ?? undefined;
const timeline = React.useMemo(() => {
function toSeconds(ts) {
if (!ts) return 0;
const parts = String(ts).split(":");
const [mm, ss] = parts.length === 2 ? parts : ["0", "0"];
const m = Number(mm) || 0;
const s = Number(ss) || 0;
return m * 60 + s;
}
return Array.isArray(script)
? script.map((item) => ({
start: toSeconds(item.start),
end: toSeconds(item.end),
description: item.description || "",
}))
: [];
}, []);
function formatSeconds(totalSeconds) {
const total = Math.max(0, Math.floor(Number(totalSeconds) || 0));
const minutes = Math.floor(total / 60);
const seconds = total % 60;
const pad = (n) => String(n).padStart(2, "0");
return `${pad(minutes)}:${pad(seconds)}`;
}
const findDescriptionForTime = React.useCallback(
(t) => {
for (let i = 0; i < timeline.length; i++) {
const seg = timeline[i];
if (t >= seg.start && t < seg.end) {
return seg.description || "";
}
}
return "";
},
[timeline]
);
const sendDescriptionForTime = React.useCallback(
(t, { force } = { force: false }) => {
const bucket = Math.floor(Number(t || 0) / 10);
if (!force && bucket === lastBucketRef.current) return;
lastBucketRef.current = bucket;
const desc = findDescriptionForTime(Number(t || 0));
if (
typeof window !== "undefined" &&
window.oai &&
window.oai.widget &&
typeof window.oai.widget.setState === "function"
) {
window.oai.widget.setState({
currentSceneDescription: desc,
videoDescription: VIDEO_DESCRIPTION,
});
}
},
[findDescriptionForTime]
);
async function handlePlayClick() {
setShowOverlayPlay(false);
setShowControls(true);
try {
if (displayMode === "inline") {
await window?.openai?.requestDisplayMode?.({ mode: "pip" });
}
} catch {}
try {
await videoRef.current?.play?.();
} catch {}
}
React.useEffect(() => {
const el = videoRef.current;
if (!el) return;
function handlePlay() {
setIsPlaying(true);
isPlayingRef.current = true;
// Immediate update on play
sendDescriptionForTime(el.currentTime, { force: true });
setCurrentTime(el.currentTime);
}
function handlePause() {
setIsPlaying(false);
isPlayingRef.current = false;
}
function handleEnded() {
setIsPlaying(false);
isPlayingRef.current = false;
}
function handleTimeUpdate() {
if (!isPlayingRef.current) return;
sendDescriptionForTime(el.currentTime);
setCurrentTime(el.currentTime);
}
function handleSeeking() {
// Update immediately while user scrubs or jumps
sendDescriptionForTime(el.currentTime, { force: true });
setCurrentTime(el.currentTime);
}
function handleSeeked() {
// Ensure we reflect the final position after seek completes
sendDescriptionForTime(el.currentTime, { force: true });
setCurrentTime(el.currentTime);
}
el.addEventListener("play", handlePlay);
el.addEventListener("pause", handlePause);
el.addEventListener("ended", handleEnded);
el.addEventListener("timeupdate", handleTimeUpdate);
el.addEventListener("seeking", handleSeeking);
el.addEventListener("seeked", handleSeeked);
return () => {
el.removeEventListener("play", handlePlay);
el.removeEventListener("pause", handlePause);
el.removeEventListener("ended", handleEnded);
el.removeEventListener("timeupdate", handleTimeUpdate);
el.removeEventListener("seeking", handleSeeking);
el.removeEventListener("seeked", handleSeeked);
};
}, [sendDescriptionForTime]);
// If the host returns the component to inline mode, pause and show the overlay play button
React.useEffect(() => {
if (displayMode !== "inline") return;
try {
videoRef.current?.pause?.();
} catch {}
setIsPlaying(false);
isPlayingRef.current = false;
setShowControls(false);
setShowOverlayPlay(true);
}, [displayMode]);
return (
<div
className="relative w-full bg-white group"
style={{ aspectRatio: "16 / 9", maxHeight }}
>
<div
className={
isFullscreen
? "flex flex-col lg:flex-row w-full h-full gap-4 p-4"
: "w-full h-full"
}
>
{/* Left: Video */}
<div
className={
isFullscreen ? "relative flex-1 h-full" : "relative w-full h-full"
}
>
<div style={{ aspectRatio: "16 / 9" }} className="relative w-full">
<video
ref={videoRef}
className={
"absolute inset-0 w-full h-auto" +
(isFullscreen ? " shadow-lg rounded-3xl" : "")
}
controls={showControls}
playsInline
preload="metadata"
aria-label="How to make pizza"
>
<source
src="https://obamawhitehouse.archives.gov/videos/2017/January/20170114_Weekly_Address_HD.mp4#t=8"
type="video/mp4"
/>
Your browser does not support the video tag.
</video>
<div className="absolute inset-0 z-10 flex items-center justify-center pointer-events-none">
{showOverlayPlay && (
<button
type="button"
aria-label="Play video"
className="h-20 w-20 backdrop-blur-xl bg-black/40 ring ring-black/20 shadow-xl rounded-full text-white flex items-center justify-center transition pointer-events-auto"
onClick={handlePlayClick}
>
<Play
strokeWidth={1.5}
className="h-10 w-10"
aria-hidden="true"
/>
</button>
)}
</div>
</div>
{displayMode !== "fullscreen" && (
<button
aria-label="Enter fullscreen"
className="absolute top-3 right-3 z-20 rounded-full bg-black/30 backdrop-blur-2xl text-white p-2 pointer-events-auto"
onClick={() => {
if (
displayMode !== "fullscreen" &&
window?.openai?.requestDisplayMode
) {
window.openai.requestDisplayMode({ mode: "fullscreen" });
}
}}
>
<Maximize2
strokeWidth={1.5}
className="h-4.5 w-4.5"
aria-hidden="true"
/>
</button>
)}
{/* Hover title overlay (hidden in fullscreen) */}
{!isFullscreen && (
<div className="absolute left-2 right-0 bottom-18 pointer-events-none flex justify-start">
<div className="text-white px-3 py-1 transition-opacity duration-150 opacity-0 group-hover:opacity-100">
<div className="text-sm font-medium text-white/60">
Weekly Address
</div>
<div className="text-2xl font-medium">
The Honor of Serving You as President
</div>
</div>
</div>
)}
</div>
{/* Right: Details panel (fullscreen only) */}
{isFullscreen && (
<div className="w-full lg:w-[364px] px-4 h-full flex flex-col">
<div className="text-sm mt-4 text-black/60">Weekly Address</div>
<div className="text-3xl leading-tighter font-medium text-black mt-4">
The Honor of Serving You as President
</div>
<div className="mt-4 flex items-center gap-3 text-sm text-black/70">
<img
src="https://upload.wikimedia.org/wikipedia/commons/8/8d/President_Barack_Obama.jpg"
alt="Barack Obama portrait"
className="h-8 translate-y-[1px] w-8 rounded-full object-cover ring-1 ring-black/10"
/>
<div className="flex flex-col h-full">
<span className="text-sm font-medium">President Obama</span>
<span className="text-sm text-black/60">January 13, 2017</span>
</div>
</div>
<div className="mt-8 inline-flex rounded-full bg-black/5 p-1">
<button
type="button"
className={
"px-3 py-1.5 text-sm font-medium rounded-full flex-auto transition " +
(activeTab === "summary"
? "bg-white shadow text-black"
: "text-black/60 hover:text-black")
}
onClick={() => setActiveTab("summary")}
>
Summary
</button>
<button
type="button"
className={
"ml-1 px-3 py-1.5 font-medium text-sm flex-auto rounded-full transition " +
(activeTab === "transcript"
? "bg-white shadow text-black"
: "text-black/60 hover:text-black")
}
onClick={() => setActiveTab("transcript")}
>
Transcript
</button>
</div>
<div
className="mt-5 text-sm overflow-auto pb-32 text-black/80"
style={{
WebkitMaskImage:
"linear-gradient(to bottom, black 75%, rgba(0,0,0,0) 100%)",
maskImage:
"linear-gradient(to bottom, black 75%, rgba(0,0,0,0) 100%)",
}}
>
{activeTab === "summary" ? (
<p>
<p>
This week, President Obama delivered his final weekly
address thanking the American people for making him a better
President and a better man. Over the past eight years, we
have seen the goodness, resilience, and hope of the American
people. We’ve seen what’s possible when we come together in
the hard, but vital work of self-government – but we can’t
take our democracy for granted. Our success as a Nation
depends on our participation.
</p>
<p className="mt-6">
It’s up to all of us to be guardians of our democracy, and
to embrace the task of continually trying to improve our
Nation. Despite our differences, we all share the same
title: Citizen. And that is why President Obama looks
forward to working by your side, as a citizen, for all of
his remaining days.
</p>
</p>
) : (
<div>
{timeline.map((seg, idx) => {
const isActive =
currentTime >= seg.start && currentTime < seg.end;
return (
<p
key={idx}
className={
"px-2 py-1 rounded-md my-0.5 transition-colors transition-opacity duration-300 flex items-start gap-2 " +
(isActive
? "bg-black/5 opacity-100"
: "bg-transparent opacity-80")
}
>
<span className="text-xs text-black/40 tabular-nums leading-5 mt-0.5 mr-1">
{formatSeconds(seg.start)}
</span>
<span className="flex-1">{seg.description}</span>
</p>
);
})}
</div>
)}
</div>
</div>
)}
</div>
</div>
);
}
import React from "react";
import { motion } from "framer-motion";
import { Star, X } from "lucide-react";
export default function Inspector({ place, onClose }) {
if (!place) return null;
return (
<motion.div
key={place.id}
initial={{ opacity: 0, scale: 0.95 }}
animate={{ opacity: 1, scale: 1 }}
exit={{ opacity: 0, scale: 0.95 }}
transition={{ type: "spring", bounce: 0, duration: 0.25 }}
className="pizzaz-inspector absolute inset-0 z-30 w-full lg:absolute lg:inset-auto lg:top-8 lg:bottom-8 lg:right-8 lg:z-20 lg:w-[360px] lg:max-w-[75%] pointer-events-auto"
>
<button
aria-label="Close details"
className="hidden lg:inline-flex absolute z-10 top-4 left-4 rounded-full p-2 bg-white ring ring-black/5 shadow-2xl hover:bg-white"
onClick={onClose}
>
<X className="h-[18px] w-[18px]" aria-hidden="true" />
</button>
<div className="relative h-full overflow-y-auto rounded-none lg:rounded-3xl bg-white text-black shadow-xl ring ring-black/10">
<div className="relative">
<img
src={place.thumbnail}
alt={place.name}
className="w-full h-80 object-cover rounded-none lg:rounded-t-2xl"
/>
</div>
<div className="h-[calc(100%-11rem)] sm:h-[calc(100%-14rem)]">
<div className="p-4 sm:p-5">
<div className="text-2xl font-medium truncate">{place.name}</div>
<div className="text-sm mt-1 opacity-70 flex items-center gap-1">
<Star className="h-3.5 w-3.5" aria-hidden="true" />
{place.rating.toFixed(1)}
{place.price ? <span>· {place.price}</span> : null}
<span>· San Francisco</span>
</div>
<div className="mt-3 flex flex-row items-center gap-3 font-medium">
<div className="rounded-full bg-[#F46C21] text-white cursor-pointer px-4 py-1.5">Order Online</div>
<div className="rounded-full border border-[#F46C21]/50 text-[#F46C21] cursor-pointer px-4 py-1.5">Contact</div>
</div>
<div className="text-sm mt-5">
{place.description} Enjoy a slice at one of SF's favorites. Fresh ingredients, great crust, and cozy vibes.
</div>
</div>
<div className="px-4 sm:px-5 pb-4">
<div className="text-lg font-medium mb-2">Reviews</div>
<ul className="space-y-3 divide-y divide-black/5">
{[\
{\
user: "Alex M.",\
avatar: "https://i.pravatar.cc/40?img=3",\
text: "Fantastic crust and balanced toppings. The marinara is spot on!",\
},\
{\
user: "Priya S.",\
avatar: "https://i.pravatar.cc/40?img=5",\
text: "Cozy vibe and friendly staff. Quick service on a Friday night.",\
},\
{\
user: "Jordan R.",\
avatar: "https://i.pravatar.cc/40?img=8",\
text: "Great for sharing. Will definitely come back with friends.",\
},\
].map((review, idx) => (
<li key={idx} className="py-3">
<div className="flex items-start gap-3">
<img
src={review.avatar}
alt={`${review.user} avatar`}
className="h-8 w-8 ring ring-black/5 rounded-full object-cover flex-none"
/>
<div className="min-w-0 gap-1 flex flex-col">
<div className="text-xs font-medium text-black/70">{review.user}</div>
<div className="text-sm">{review.text}</div>
</div>
</div>
</li>
))}
</ul>
</div>
</div>
</div>
</motion.div>
);
}
import React from "react";
import useEmblaCarousel from "embla-carousel-react";
import { useOpenaiGlobal } from "../use-openai-global";
import { Filter, Settings2, Star } from "lucide-react";
function PlaceListItem({ place, isSelected, onClick }) {
return (
<div
className={
"rounded-2xl px-3 select-none hover:bg-black/5 cursor-pointer" +
(isSelected ? " bg-black/5" : "")
}
>
<div
className={`border-b ${
isSelected ? "border-black/0" : "border-black/5"
} hover:border-black/0`}
>
<button
className="w-full text-left py-3 transition flex gap-3 items-center"
onClick={onClick}
>
<img
src={place.thumbnail}
alt={place.name}
className="h-16 w-16 rounded-lg object-cover flex-none"
/>
<div className="min-w-0">
<div className="font-medium truncate">{place.name}</div>
<div className="text-xs text-black/50 truncate">
{place.description}
</div>
<div className="text-xs mt-1 text-black/50 flex items-center gap-1">
<Star className="h-3 w-3" aria-hidden="true" />
{place.rating.toFixed(1)}
{place.price ? <span className="">· {place.price}</span> : null}
</div>
</div>
</button>
</div>
</div>
);
}
export default function Sidebar({ places, selectedId, onSelect }) {
const [emblaRef] = useEmblaCarousel({ dragFree: true, loop: false });
const displayMode = useOpenaiGlobal("displayMode");
const forceMobile = displayMode !== "fullscreen";
return (
<>
{/* Desktop/Tablet sidebar */}
<div className={`${forceMobile ? "hidden" : "hidden md:block"} absolute inset-y-0 left-0 z-20 w-[340px] max-w-[75%] pointer-events-auto`}>
<div className="px-2 h-full overflow-y-auto bg-white text-black">
<div className="flex justify-between flex-row items-center px-3 sticky bg-white top-0 py-4 text-md font-medium">
{places.length} results
<div>
<Settings2 className="h-5 w-5" aria-hidden="true" />
</div>
</div>
<div>
{places.map((place) => (
<PlaceListItem
key={place.id}
place={place}
isSelected={displayMode === "fullscreen" && selectedId === place.id}
onClick={() => onSelect(place)}
/>
))}
</div>
</div>
</div>
{/* Mobile bottom carousel */}
<div className={`${forceMobile ? "" : "md:hidden"} absolute inset-x-0 bottom-0 z-20 pointer-events-auto`}>
<div className="pt-2 text-black">
<div className="overflow-hidden" ref={emblaRef}>
<div className="px-3 py-3 flex gap-3">
{places.map((place) => (
<div className="ring ring-black/10 max-w-[330px] w-full shadow-xl rounded-2xl bg-white">
<PlaceListItem
key={place.id}
place={place}
isSelected={displayMode === "fullscreen" && selectedId === place.id}
onClick={() => onSelect(place)}
/>
</div>
))}
</div>
</div>
</div>
</div>
</>
);
}
{
"places": [\
{\
"id": "tonys-pizza-napoletana",\
"name": "Tony's Pizza Napoletana",\
"coords": [-122.4098, 37.8001],\
"description": "Award‑winning Neapolitan pies in North Beach.",\
"city": "North Beach",\
"rating": 4.8,\
"price": "$$$",\
"thumbnail": "https://images.unsplash.com/photo-1513104890138-7c749659a591?q=80&w=2670&auto=format&fit=crop&ixlib=rb-4.1.0&ixid=M3wxMjA3fDB8MHxwaG90by1wYWdlfHx8fGVufDB8fHx8fA%3D%3D"\
},\
{\
"id": "golden-boy-pizza",\
"name": "Golden Boy Pizza",\
"coords": [-122.4093, 37.7990],\
"description": "Focaccia‑style squares, late‑night favorite.",\
"city": "North Beach",\
"rating": 4.6,\
"price": "$",\
"thumbnail": "https://plus.unsplash.com/premium_photo-1661762555601-47d088a26b50?w=900&auto=format&fit=crop&q=60&ixlib=rb-4.1.0&ixid=M3wxMjA3fDB8MHxzZWFyY2h8OXx8cGl6emF8ZW58MHx8MHx8fDA%3D"\
},\
{\
"id": "pizzeria-delfina-mission",\
"name": "Pizzeria Delfina (Mission)",\
"coords": [-122.4255, 37.7613],\
"description": "Thin‑crust classics on 18th Street.",\
"city": "Mission",\
"rating": 4.5,\
"price": "$$",\
"thumbnail": "https://images.unsplash.com/photo-1571997478779-2adcbbe9ab2f?w=900&auto=format&fit=crop&q=60&ixlib=rb-4.1.0&ixid=M3wxMjA3fDB8MHxzZWFyY2h8OHx8cGl6emF8ZW58MHx8MHx8fDA%3D"\
},\
{\
"id": "little-star-divisadero",\
"name": "Little Star Pizza",\
"coords": [-122.4388, 37.7775],\
"description": "Deep‑dish and cornmeal crust favorites.",\
"city": "Alamo Square",\
"rating": 4.5,\
"price": "$$",\
"thumbnail": "https://images.unsplash.com/photo-1579751626657-72bc17010498?w=900&auto=format&fit=crop&q=60&ixlib=rb-4.1.0&ixid=M3wxMjA3fDB8MHxzZWFyY2h8MTB8fHBpenphfGVufDB8fDB8fHww"\
},\
{\
"id": "il-casaro-columbus",\
"name": "Il Casaro Pizzeria",\
"coords": [-122.4077, 37.7990],\
"description": "Wood‑fired pies and burrata in North Beach.",\
"city": "North Beach",\
"rating": 4.6,\
"price": "$$",\
"thumbnail": "https://images.unsplash.com/photo-1594007654729-407eedc4be65?w=900&auto=format&fit=crop&q=60&ixlib=rb-4.1.0&ixid=M3wxMjA3fDB8MHxzZWFyY2h8MTF8fHBpenphfGVufDB8fDB8fHww"\
},\
{\
"id": "capos",\
"name": "Capo's",\
"coords": [-122.4097, 37.7992],\
"description": "Chicago‑style pies from Tony Gemignani.",\
"city": "North Beach",\
"rating": 4.4,\
"price": "$$$",\
"thumbnail": "https://images.unsplash.com/photo-1593560708920-61dd98c46a4e?w=900&auto=format&fit=crop&q=60&ixlib=rb-4.1.0&ixid=M3wxMjA3fDB8MHxzZWFyY2h8MTV8fHBpenphfGVufDB8fDB8fHww"\
},\
{\
"id": "ragazza",\
"name": "Ragazza",\
"coords": [-122.4380, 37.7722],\
"description": "Neighborhood spot with seasonal toppings.",\
"city": "Lower Haight",\
"rating": 4.4,\
"price": "$$",\
"thumbnail": "https://images.unsplash.com/photo-1600028068383-ea11a7a101f3?w=900&auto=format&fit=crop&q=60&ixlib=rb-4.1.0&ixid=M3wxMjA3fDB8MHxzZWFyY2h8MTl8fHBpenphfGVufDB8fDB8fHww"\
},\
{\
"id": "del-popolo",\
"name": "Del Popolo",\
"coords": [-122.4123, 37.7899],\
"description": "Sourdough, wood‑fired pies near Nob Hill.",\
"city": "Nob Hill",\
"rating": 4.6,\
"price": "$$$",\
"thumbnail": "https://images.unsplash.com/photo-1574071318508-1cdbab80d002?w=900&auto=format&fit=crop&q=60&ixlib=rb-4.1.0&ixid=M3wxMjA3fDB8MHxzZWFyY2h8MjZ8fHBpenphfGVufDB8fDB8fHww"\
},\
{\
"id": "square-pie-guys",\
"name": "Square Pie Guys",\
"coords": [-122.4135, 37.7805],\
"description": "Crispy‑edged Detroit‑style in SoMa.",\
"city": "SoMa",\
"rating": 4.5,\
"price": "$$",\
"thumbnail": "https://images.unsplash.com/photo-1589187151053-5ec8818e661b?w=900&auto=format&fit=crop&q=60&ixlib=rb-4.1.0&ixid=M3wxMjA3fDB8MHxzZWFyY2h8Mzl8fHBpenphfGVufDB8fDB8fHww"\
},\
{\
"id": "zero-zero",\
"name": "Zero Zero",\
"coords": [-122.4019, 37.7818],\
"description": "Bianca pies and cocktails near Yerba Buena.",\
"city": "Yerba Buena",\
"rating": 4.3,\
"price": "$$",\
"thumbnail": "https://plus.unsplash.com/premium_photo-1674147605295-53b30e11d8c0?w=900&auto=format&fit=crop&q=60&ixlib=rb-4.1.0&ixid=M3wxMjA3fDB8MHxzZWFyY2h8NDF8fHBpenphfGVufDB8fDB8fHww"\
}\
]
}
```
```